


Open a print-ready PDF and you’ll usually find small lines sitting in each corner, well away from the artwork. Those are crop marks, and they tell whoever runs the cutter where to trim a printed sheet to its finished size. Designers place them beyond the trim line, so the lines get cut away with the waste.
InDesign and Illustrator both generate them at export, and commercial offset workflows lean on them heavily.
The marks aren’t the only place the finished size lives, though. An exported PDF also stores it in its trim box (Adobe Acrobat documentation), and some printers, Amazon KDP among them, tell designers to leave the marks out.
What Are Crop Marks?
Short lines in the corners of a sheet, set outside the artwork, show the cutter where the finished edge falls.
Printers run jobs on sheets bigger than the final piece because most printing devices cannot print to the paper edge (University of Bristol Print Services). A guillotine or a technician then cuts along the marks.
Whatever sits between the marks becomes the piece you hold, so they have to match the finished trim size of the job. A mark placed a few millimeters off shifts the cut on every copy.
Trim marks is the more common alternate name. Cutting marks and tick marks turn up too (Tradeprint). Adobe’s Illustrator help treats trim marks and crop marks as one thing, so the label rarely changes the result.
Two other printer’s marks get mistaken for crop marks all the time. Registration marks are crosshair targets that line up the cyan, magenta, yellow and black plates on press. Color bars are strips of ink patches that press operators read to check density. Printninja’s printer’s marks guide notes that both get trimmed off once printing ends.
A few glossaries list registration marks as another name for crop marks. They are a different mark with a different job, though one file can carry both.
How Do Crop Marks Relate to Trim, Bleed and Slug?
The marks show where the blade lands. Bleed covers for the blade’s error, and the slug, out past the bleed, holds the marks and any job notes.
Working outward from the center, the layers go like this:
- The safe area, where text and logos stay clear of the blade
- The trim line, which is the finished size the crop marks point to
- Bleed, meaning artwork that runs past the trim so no white edge shows
- Out beyond that sits the slug, the zone for printer instructions and job sign-off details (Adobe InDesign documentation)
Cutting is never perfectly exact, which is why bleed in print files exists. Bristol Print Services describes it as tolerance during printing and guillotining, so no white line shows on the page edge.
Adobe’s InDesign help adds a setup rule. Extend the artwork past the crop marks to fill the bleed, and make the media size large enough to hold the marks along with the bleed and slug.
Inside the trim, keep text within the safe zone of a print layout, because the blade can drift. Vistaprint’s guidance is that marks and bleed are always recommended but matter most when the design runs right up to the trim line.
One trap in Illustrator. The artboard edge is a visible but non-printing boundary, while crop marks are real printed lines (Adobe Illustrator help).
Take a US business card, which trims to 3.5 x 2 inches (Vistaprint). Add 0.125 inch of bleed on every side and the artwork gets built at 3.75 x 2.25 inches, with the crop marks pointing at the inner 3.5 x 2 rectangle.
Some reference numbers worth keeping nearby:
- 3 mm of bleed recommended wherever possible (University of Bristol Print Services)
- 5 mm minimum safe area inside the page edge (University of Bristol Print Services)
- A fixed 0.125 inch (3.175 mm) bleed on trimmed products (Canva Help Center)
- -100 to +100 mm adjustable mark position range (Canon Professional Print & Layout manual)
Where Do Crop Marks Go, and How Do Offset, Weight and Color Work?
The marks go outside the trim line, nudged away from the artwork by an offset that should be at least as big as the bleed. They print as thin lines in registration color, which puts them on every plate.
Offset From the Trim Line
Adobe’s InDesign documentation says to make the offset larger than the bleed so the marks never overlap the bleed area. With a 0.125 inch bleed, use an offset of at least 9 points (0.125 inch).
A 3 mm bleed calls for an offset of at least 3 mm. If the printer asks for a deeper bleed, the offset has to go up with it.
Marks that sit inside the bleed can survive the trim when the cut drifts. Experienced users on the Adobe Community forum also point out that offset moves crop marks but leaves bleed marks parked at the bleed corner.
So the offset should equal or exceed the bleed, and the rest is detail.
Line Weight and Registration Color
The marks print in registration color, which lands at 100% on every separation plate (Durst user manual). The same manual says to use it for registration or crop marks only, never for deep black areas or text (Durst).
Because the marks are line objects, they have to meet the minimum line thickness of the plate type (Boxcar Press). To thicken Illustrator’s crop marks, you expand them first (Boxcar Press).
Plain 100% black belongs to the black plate alone. Registration black puts the mark on every plate of a CMYK job, which is why Adobe’s Illustrator help prints crop marks that way.
Single-Line and Japanese Double-Line Styles

| Style | Lines indicate | Where offered |
|---|---|---|
| Single mark with bleed | Bleed area | Canon Professional Print & Layout |
| Single mark without bleed | Trim size | Canon Professional Print & Layout |
| Double mark (Japan) | Trim size and bleed area | Canon; Illustrator’s Japanese crop marks option |
The double mark packs trim and bleed into one pair of lines. Use it only when the printer specifies it.
When Are Crop Marks Not Needed?
Nothing needs marking if nothing gets trimmed after printing, and the same goes for jobs where the printer adds its own. Apparel skips them (Vistaprint), and Adobe says to leave printer’s marks off files for digital or office printing.
Skip them for any product that never gets cut. Jobs where ink never reaches the paper edge don’t need them either, since Canva applies no bleed to apparel or drinkware, or to printed envelopes. Files headed to an office printer or a screen can go without, and so can any job where the printer’s spec says it applies its own marks.
Sources disagree on who supplies the marks when a job does get trimmed.
| Position | Who holds it | Reason given |
|---|---|---|
| Designer supplies the marks | Vistaprint, Boxcar Press | Only the designer knows the trim |
| Printer adds its own | Adobe Community experts | The PDF already stores the trim size |
| Marks stay in the file | Printplanet forum posters | Visible cross-check against imposition marks |
Boxcar Press goes furthest and adds crop marks to no customer file, since it cannot know where the intended trim lands.
On imposed press sheets (pages arranged for one press run), the shop’s software adds its own marks. One Printplanet poster keeps the file’s marks anyway, to compare them against the imposed ones, and notes that the PDF’s trim box still records the finished size without any marks.
Ask the printer first. Adobe’s own guidance is to confirm which marks the print provider expects.
With no spec in hand, build a print-ready file the usual way, with bleed on, marks on and the offset past the bleed. A vendor that does not want the marks can remove them.
How to Add Crop Marks in Common Design Software
Every app has its own route. Some produce the marks at export and some through a menu command. InDesign and Illustrator give the most control, and Canva gives you a single checkbox.
| Software | Where the marks come from | What you control |
|---|---|---|
| Illustrator | Object > Create Trim Marks, Effect > Crop Marks, or Marks and Bleeds when saving as PDF | Editable paths or a live effect |
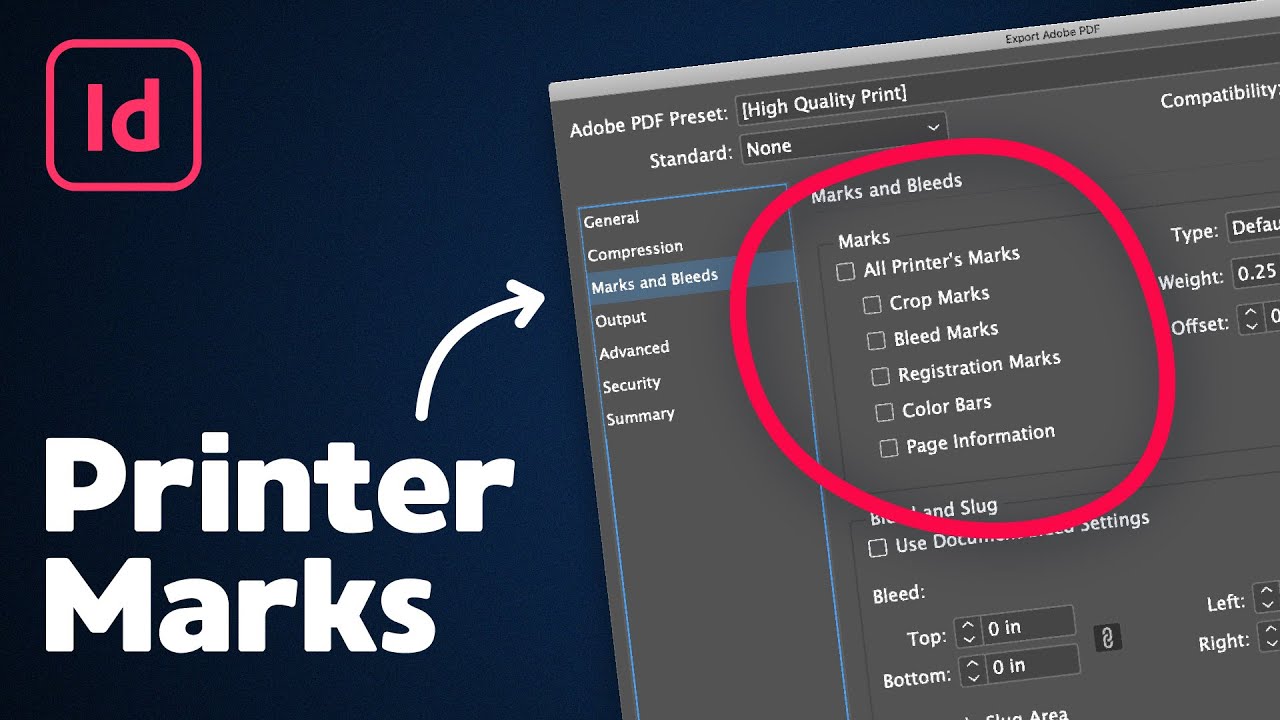
| InDesign | File > Export > Adobe PDF (Print) > Marks and Bleeds | Mark type, weight, offset |
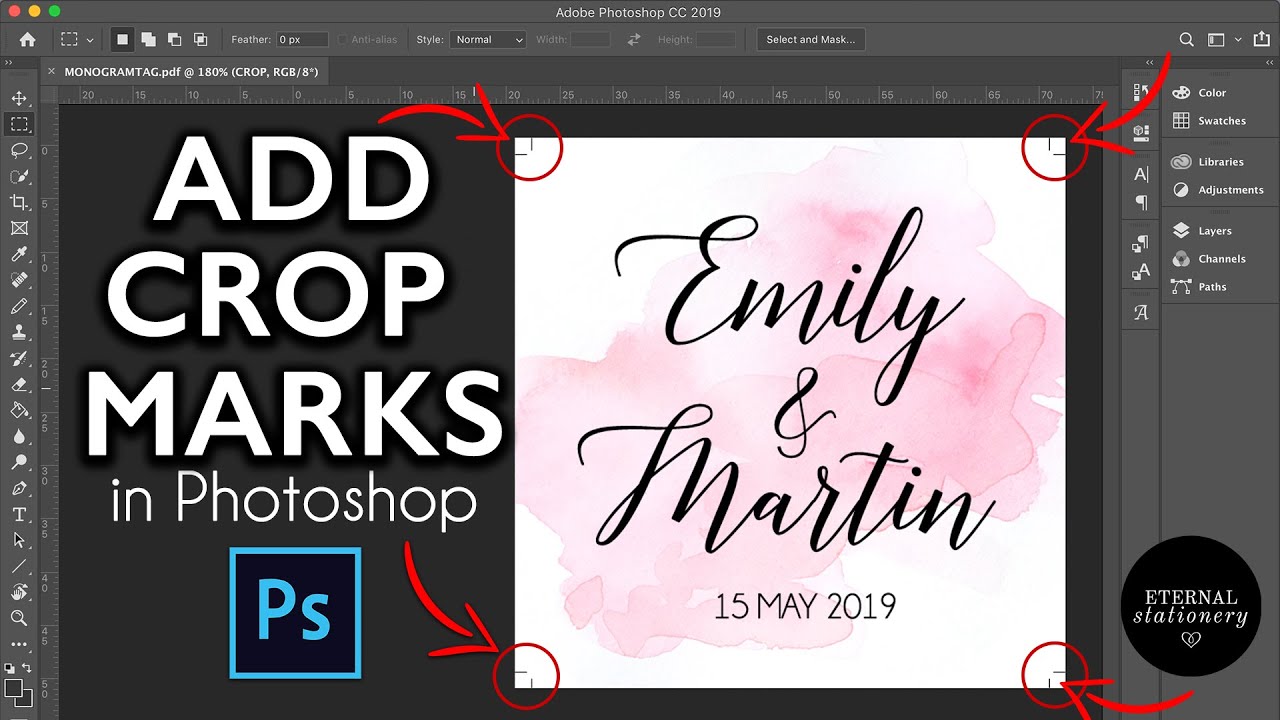
| Photoshop | File > Print > Printing Marks > Corner Crop Marks | Bleed distance via the Bleed button |
| CorelDRAW | File > Print > Prepress tab > Crop/fold marks | Bleed limit, Marks to objects option |
| Canva | Share > Download > PDF Print > Crop marks and bleed | Nothing, mark size is fixed |
The table draws on Adobe’s Illustrator and InDesign help, Corel’s printer’s marks documentation, the Canva Help Center and Adobe Community answers for Photoshop.
Illustrator has two routes. Create Trim Marks draws plain lines you can edit, while Effect > Crop Marks is live and resizes with the object it was applied to.
Set the bleed in the document first, the way setting up bleed in Illustrator walks through, because the PDF export reads it from Document Setup.
In InDesign the marks are an output setting and never part of the layout. Bleed and slug live in Document Setup, and the export dialog picks them up.
Photoshop is the weakest route, and I wouldn’t bother with it for anything that needs marks. An Adobe Community expert notes that it has no single function that just adds crop marks, and hand-drawn marks do not set a trim box or bleed box.
When marks matter, build the file in InDesign or Illustrator and bring the Photoshop image in as a placed graphic.
In Canva, marks arrive only with a PDF Print download, and saving a Canva design as a PDF covers the rest of that export. Canva’s Help Center adds that Canva Docs has no margins, bleed or crop marks at all.
Acrobat Pro works on a finished file. Tools > Print Production > Add Printer Marks embeds the marks in the PDF, optionally on a layer (Adobe Acrobat help).
How to Export a Print PDF With Crop Marks
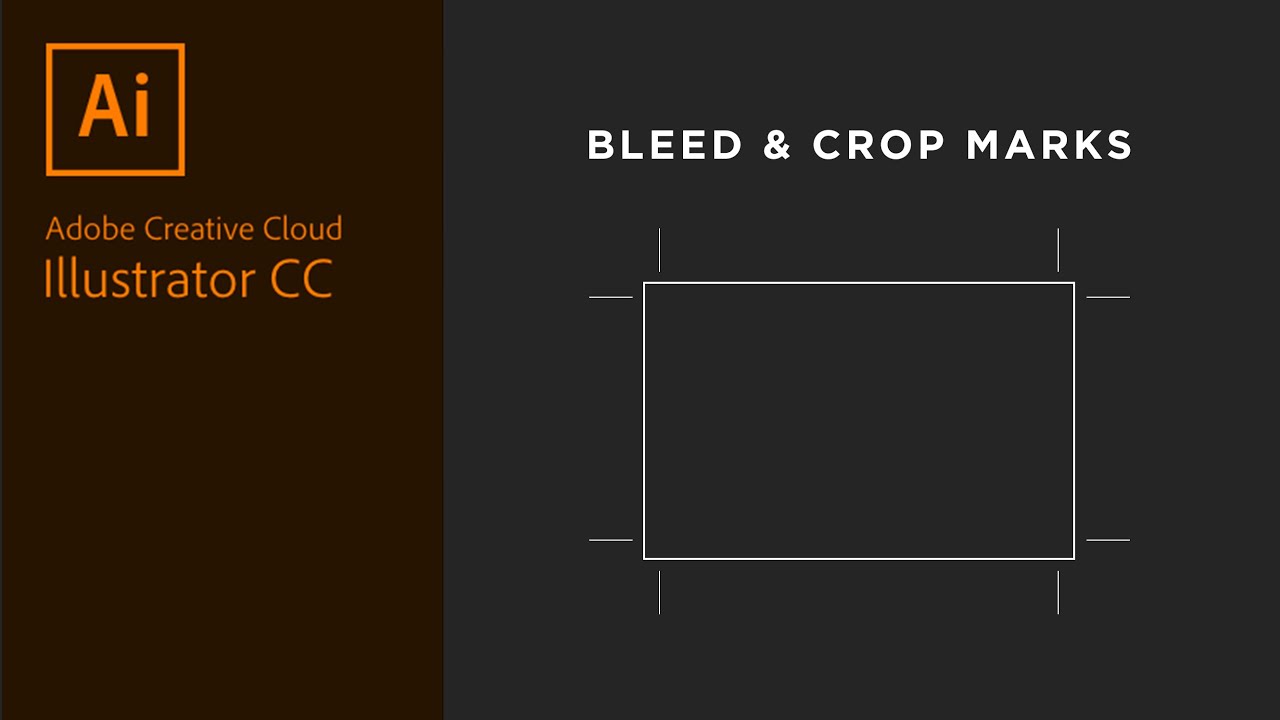
Set the bleed in the document, tick Crop Marks and Use Document Bleed Settings in the PDF export dialog, then inspect the result in Acrobat Pro. Marks and bleed export separately, so a missed checkbox in either place breaks the file.
- Read the printer’s spec before touching a setting. Some platforms want marks and some forbid them. Amazon KDP’s help says submitted print files should not contain crop marks or trim marks.
- Define the bleed in Document Setup. Illustrator takes it from the New Document dialog, InDesign from File > Document Setup.
- Extend backgrounds and images past the trim edge, all the way to the bleed line.
- Open the export dialog. In InDesign that is File > Export > Adobe PDF (Print), then Marks and Bleeds. In Illustrator it is File > Save As > Adobe PDF, then Marks and Bleeds.
- Tick Crop Marks (called Trim Marks in Illustrator) and Use Document Bleed Settings, and set the offset above the bleed value.
- Export, then open the file in Acrobat Pro and choose Tools > Print Production > Set Page Boxes. Show All Boxes draws the crop, art, trim and bleed rectangles on the page.
- Run Preflight from the same Print Production menu.
Acrobat Reader cannot inspect bleed boxes, according to an Adobe Community answer, so the box check needs Pro.
Preflight runs more than 400 predefined checks (Adobe), but it is no substitute for checking by eye that the artwork reaches the bleed line.
Adobe’s InDesign help explains why the exported page is bigger than the trim size. Selecting any page-mark option expands the page boundaries to hold the marks, bleed or slug.
| PDF box | What it records | Role next to the marks |
|---|---|---|
| Media box | The full physical sheet | Grows to hold marks, bleed and slug |
| Crop box | Visible region in a viewer | Clips marks when set too small |
| Trim box | Finished page size | The rectangle the crop marks point to |
| Bleed box | Clip region in production | Larger than the trim box, smaller than the marks |
Definitions follow Adobe’s Acrobat help and the PDF specification as documented in the PDF-XChange SDK. The SDK notes that a printed page may carry marks outside the bleed box.
Affinity Publisher users get the same two-part logic. Printer WhiteWall tells customers to tick the Include bleed checkbox in the PDF export dialog so the bleed area reaches the file.
Why Do Crop Marks Show Up in the Wrong Place or Not at All?
Marks land in the wrong place when the offset trails the bleed or when two sets collide, and ticking bleed marks instead of crop marks makes the same kind of mess. They go missing when export settings leave them off or the page cannot hold them.
Marks Appear Inside the Bleed
Start by comparing the bleed typed into Document Setup with the offset typed into the export dialog.
The usual cause is a bleed that changed while the offset did not. A printer asks for a deeper bleed, the default offset stays put, and the marks end up inside the new bleed (a pattern across Adobe Community threads).
In Illustrator, Effect > Crop Marks is dynamic, so stretching the rectangle drags the marks with it. They also follow whatever shape they were applied to, so use a rectangle built at the finished trim size.
Fix the number or the object, re-export, and check all four corners.
Marks Missing From the Exported File
These turn up most often:
- InDesign’s High Quality Print preset does not switch marks on by itself (Adobe Community)
- Canva shows no marks in the editor, only in the exported PDF (Canva Help Center)
- Photoshop corner marks can fall outside the printer’s printable area, which is the first thing an Adobe Community expert suggests checking
- A crop box that is too small to hold them
Acrobat Pro can add the missing marks after export. The Add Printer Marks tool exists for the case where marks would be clipped because the crop box is too small, and expanding the crop box adjusts the media box to match (Adobe Acrobat help).
Marks Confused With Bleed Marks
Ticking Bleed Marks when you meant Crop Marks is a recurring mistake in Adobe Community threads.
| Mark | Aligns with | What the printer reads |
|---|---|---|
| Crop marks | Page trim | Cut here |
| Bleed marks | Outer bleed edge | How far the artwork extends |
Two sets of crop marks cause their own trouble. Printsimple, a printer that does not recommend marks at all, asks for a single set when they are used, because multiple sets may cause problems.
Adobe’s Acrobat help explains the mechanism. Marks added in Acrobat overlay the ones exported from InDesign and might not align, unless the originals sit on a layer that Acrobat replaces.
Crop Marks FAQ
How do I remove crop marks from a finished PDF?
Crop the page inward until the marks fall outside the visible area. Smallpdf’s Crop PDF tool does this in the browser, and Smallpdf advises cropping slightly further in or checking for hairline strokes when a trace remains.
Re-exporting from the source file keeps the bleed intact.
Can one page carry several sets of crop marks?
Yes, in Illustrator. Adobe’s help says you can create and display multiple sets of crop marks, which suits a sheet of business cards, while only one artboard is active at a time.
Printsimple, a printer, warns that multiple sets in one file may cause problems, so check the spec first.
Is it acceptable to draw crop marks by hand?
Yes. Adobe Community answers note that Illustrator’s Trim Marks command only draws lines, so four pairs of hand-drawn lines at the trim corners do the same job. Draw them to the printer’s specification.
Can Microsoft Publisher or Word add crop marks?
Publisher can. Vistaprint’s guide points to File > Print, Advanced Output Settings, then the Marks and Bleed tab, where a Crop marks box sits.
Word has no dependable route, so Calvin University Print Services tells users to convert the file to PDF and add trim marks in Acrobat.
Do crop marks show where to fold?
No. Crop marks show where to cut, not where to fold.
Adobe’s InDesign documentation adds one wrinkle, which is that ticking Crop Marks also prints fold marks as solid lines when spreads are printed.
What to Confirm With the Printer Before You Export
Before exporting, ask the printer whether the job wants marks at all. If it does, ask how deep the bleed runs and whether the shop expects the single-line or double-line style.
The order matters. No marks means no offset to set, and the offset depends on the bleed.
Adobe’s 9 point example offset equals 3.175 mm, so it clears the 3 mm bleed Bristol recommends and matches Canva’s 0.125 inch bleed, but leaves no room for anything deeper.
As of October 2026, Amazon KDP’s help still tells authors to leave crop marks out, so a marked master file needs a clean second export for any printer with that rule.

Renowned for his expertise in logo design and visual branding, Bogdan has developed a multitude of logos for various clients.
His skills extend to creating posters, vector illustrations, business cards, and brochures. Additionally, Bogdan's UI kits were featured on marketplaces like Visual Hierarchy and UI8.
He also wrote in the past years on sites like Design Your Way, WebDesignerDepot, WPDean, Designmodo, Speckyboy, Slider Revolution, and more.
- The Windsurf Logo History, Colors, Font, And Meaning - 10 October 2026
- How to Remove Background From Product Photos (No Photoshop) - 10 October 2026
- How Designers can Build a Stronger Online Creative Identity - 9 October 2026

Bogdan Sandu is a seasoned designer who has been designing websites since 2008. Renowned for his expertise in logo design and visual branding, Bogdan has developed a multitude of logos for various clients. His skills extend to creating posters, vector illustrations, business cards, and brochures. Additionally, Bogdan's UI kits were featured on marketplaces like Visual Hierarchy and UI8. He also wrote in the past years on sites like Design Your Way, WebDesignerDepot, WPDean, Designmodo, Speckyboy, Slider Revolution, and more.
You Might Also Like


