

It’s possible to take dozens of generations to find the right pose, camera angle, facial expressions, or background details, only to find that your art still has one more major issue.
The good thing is that advanced anime art generation platforms now offer powerful editors like PixAI’s image editing tool. The functionality avoids wasting a partially finished image by allowing you to edit or enhance only the part of the image that requires improvement.
This guide will show you how to refine anime artwork in PixAI. We’ll also look at how to use denoise strength to get a great outcome and how to combine prompt-based editing with inpainting to give your image a professional look.
Why You Don’t Need to Regenerate From Scratch
When you do a full regeneration, the actual image is discarded, leaving only the text prompt. This means that all of the decisions the model made before are reconsidered. The pose can change, the camera angle can change, and so can the style and background.
Diffusion-based models also exhibit some randomness, making it surprisingly difficult to replicate a good composition with the same prompt.
Since PixAI image-to-image works from the current image, it is a bit different. The original image serves as a blueprint for the composition, enabling PixAI to maintain the structure while incorporating fresh instructions.
This technique is particularly useful for anime illustrations where the consistency of character design, facial features, costumes, and poses are important.
So, before you regenerate, consider that:
- A good composition is difficult to create by chance.
- Many things get altered when we reconstruct an object from scratch.
- Most image issues are local and not global.
- Editing retains the good image aspects and corrects the poor parts.
- Iterative refinement is typically quicker than repeated whole generations.
In reality, skilled AI artists tend to start a generation and then make multiple small refinement passes over the base image, rather than continually starting over.
What Image-to-Image Actually Does in PixAI
PixAI image-to-image starts with existing artwork, rather than a text prompt. PixAI then lets you add a more specific prompt that preserves the original image.
The main setting is the denoise strength, which ranges from 0 to 1.0. Knowing how this one control works is essential to using image-to-image.
- Low denoise – a great deal of the original image remains intact. Best for lighting, color, texture, and small facial corrections.
- Medium denoise – adds some changes in clothing, hairstyle, pose details, or background elements, but keeps the overall layout clearly visible.
- High denoise strength – the original image is used primarily as a rough guide. The generator can radically alter the image or even create a new generation.
A good guideline is to start at a lower level than you believe you should. If the change is too subtle, increase the denoise value a little at a time. In most cases, operating between 0.4 and 0.6 often gives you the best results.
A Step-by-Step PixAI Refinement Workflow
Once you’re familiar with the correct settings, the workflow is straightforward.
- Create or upload the image you want to enhance.
- Click the “Create” button to start editing.
- Write a focused prompt that describes only the change that is desired.
- Make subtle corrections with a low denoise value.
- If there are any other localized problems, use inpainting (the edit tool)
Here’s an example of editing with a prompt.
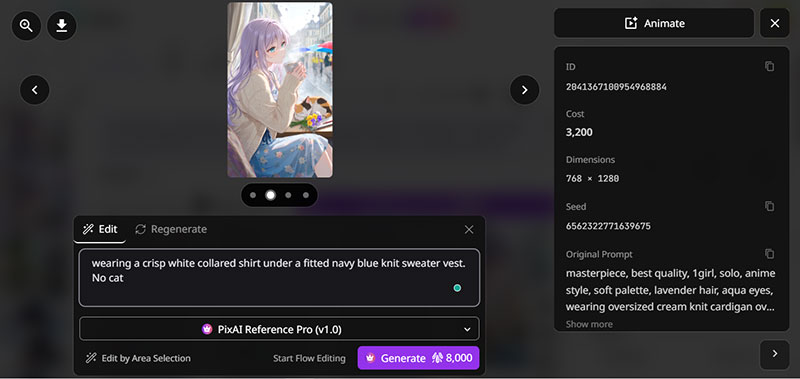
PixAI editing image via prompt
Here’s the result:
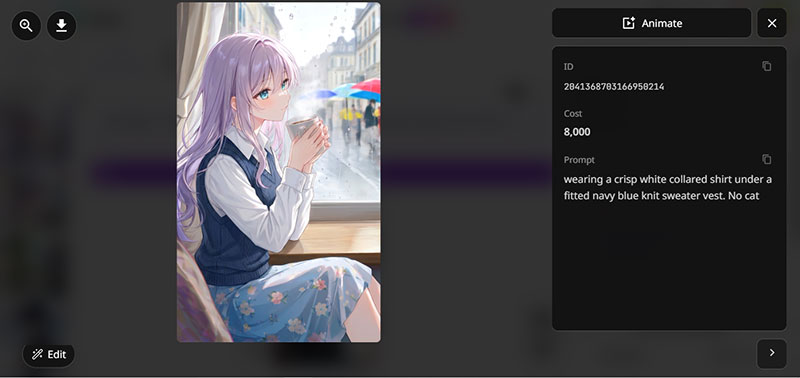
PixAI editing image via prompt result
When using the Edit tool (inpainting), just select the specific areas and type a simple prompt.
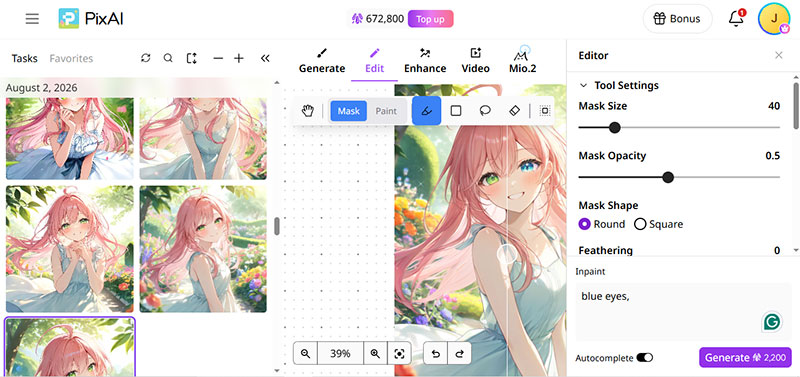
PixAI inpainting changing eyes from green to blue
And if you only need to change specific details like image quality, emotions, or hand appearance, PixAI offers a simpler Enhance tool. It allows you to upload your image and select the changes you’d like to make.
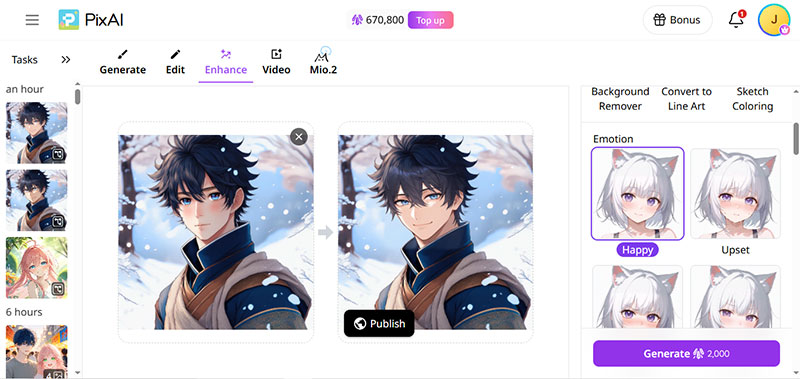
As a rule of thumb, don’t try to do too many edits at once if you intend to do more aggressive cuts later. Small iterations let you maintain more control and see whether your changes enhance the image or create new issues.
Using Inpainting Together with Image-to-Image
Image-to-image affects the entire image, whereas inpainting affects only a selected region. Combining the two tools helps achieve much higher precision.
Here’s how to know what tool to use.
| Problem | Best tool |
| Crooked finger | Inpainting |
| Uneven eye shape | Inpainting |
| Wrong clothing color | Inpainting |
| Flat background | Image-to-image |
| Overall lighting improvement | Image-to-image |
| Minor face polish | Image-to-image or Inpainting |
A common workflow is to run a low-denoise image-to-image prompt first and then inpaint any remaining small defects.
When to Use Image-to-Image vs. a Fresh Prompt
Here’s how to know you only need image-to-image:
- The composition is good, but the face could be improved.
- The hands are awkward, but the rest of the image looks good.
- The color of the outfit is incorrect, but the design is good.
- Background is lacking in depth/details.
- The image requires style polishing and not a redesign.
In case of a fundamental mistake in the composition, say you want a completely different camera angle, you can use a different prompt with your original image as the reference.
Writing Better Refinement Prompts
Don’t try to change too much if the image already has the composition you like. Instead, focus the prompt on the specific corrections you would like to make.
Here are some good refinement prompts:
- “soft cinematic lighting on face”
- “more detailed anime eyes”
- “clean hands with five fingers”
- “red kimono with gold embroidery”
- “deeper sunset background with warm rim light”
A less effective refinement prompt would be:
“best quality ultra, detailed anime girl, beautiful background, cinematic, dramatic lighting, 8k”
Specific prompts make it easier to avoid unwanted edits because the engine receives clearer editing instructions.
Common Refinement Problems and Solutions
Here are some common anime art refinement issues and their solutions:
- Hands keep changing shape – Mask only the hand area and use a very specific hand prompt.
- Face becomes a different character – Lower denoise strength and avoid changing hairstyle or expression simultaneously.
- Background changes too much – Use a lower denoise value or crop and edit only the background region.
- Colors become washed out – Add explicit color instructions such as “rich warm colors” or “high color saturation.”
- Image becomes blurry – Use a lower denoise value and a quality upscale after refinement.
Let’s look at an example:
Say you created an anime drawing of a woman in a blue kimono, standing in the sunset. The composition is great, but the left hand appears distorted, and the face is a bit too dark.
- Use image-to-image with a moderate denoise level, with the prompt: “soft warm sunset light on face, gentle cinematic lighting.” The face is illuminated, and the posture remains the same.
- Inpaint the left hand in the image using the prompt “elegant anime hand, natural fingers, relaxed pose.” Only the hand is regenerated.
- If the kimono fabric still doesn’t have texture, repeat Step 2 using the same image as the reference and the prompt “detailed silk fabric texture, subtle embroidery.”
The final image retains the original layout and corrects the three problems in three controlled steps.
Why This Workflow Saves Time
It may take twenty or thirty tries to get a composition you already had back. A specific refinement may require just a few modifications. The difference is going to make a big difference when doing projects that need character consistency, such as in commissions, social media content, game assets, character sheets, or manga illustrations.
Final Thoughts
Sometimes, it’s best to start fresh, particularly when the composition is not right. But a majority of AI artwork issues are more small-scale than that. You can save the good elements of an artwork and edit only where necessary, giving you more control, consistency, and efficiency when creating AI anime artwork.
When an anime illustration is close to perfect, just open the image in the PixAI image-to-image panel, set the denoise level to a low value, try a single change, and experiment with a few variations. If it’s something like eye color adjustment, use inpainting to focus only on the eyes. This will give you the desired result and maintain your original composition.

Renowned for his expertise in logo design and visual branding, Bogdan has developed a multitude of logos for various clients.
His skills extend to creating posters, vector illustrations, business cards, and brochures. Additionally, Bogdan's UI kits were featured on marketplaces like Visual Hierarchy and UI8.
He also wrote in the past years on sites like Design Your Way, WebDesignerDepot, WPDean, Designmodo, Speckyboy, Slider Revolution, and more.
- The Substack Logo History, Colors, Font, And Meaning - 2 October 2026
- How UX Design Impacts SaaS User Retention and Churn - 1 October 2026
- How to Embed Fonts in PDF for Reliable Printing - 30 September 2026

Bogdan Sandu is a seasoned designer who has been designing websites since 2008. Renowned for his expertise in logo design and visual branding, Bogdan has developed a multitude of logos for various clients. His skills extend to creating posters, vector illustrations, business cards, and brochures. Additionally, Bogdan's UI kits were featured on marketplaces like Visual Hierarchy and UI8. He also wrote in the past years on sites like Design Your Way, WebDesignerDepot, WPDean, Designmodo, Speckyboy, Slider Revolution, and more.
You Might Also Like


