Plain text disappears into busy designs. Highlighted text demands attention.
Learning how to highlight text in Canva gives you a simple way to add colored backgrounds behind any text element, creating instant focal points in your graphics.
The technique works for social media posts, presentations, thumbnails, and any project where specific words need to stand out.
This guide walks you through the Effects panel method (3 steps) and an alternative shape-based approach for more control.
You’ll also find color customization options, troubleshooting fixes, and tips for maintaining readable typography across your designs.
How to Highlight Text in Canva
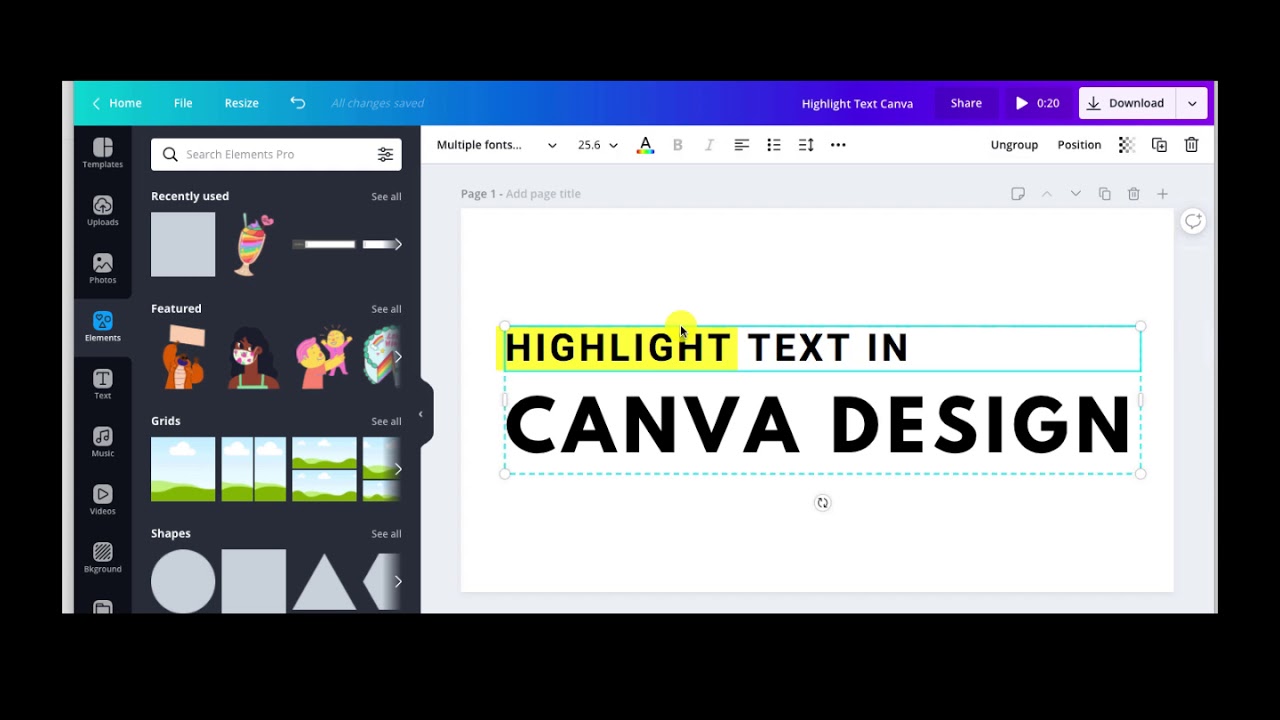
Learning how to highlight text in Canva lets you add a colored background behind any text element in your design.
Users need this when creating social media graphics, presentations, or any project where certain words require emphasis.
This guide covers 5 steps requiring 2-3 minutes and a free or Pro Canva account.
What You Need Before Starting
- Canva account (Free or Canva Pro)
- Web browser, desktop app, or mobile app
- Existing design with text elements or new project
- Time estimate: 2-3 minutes
- Skill level: Beginner
Step One: How Do You Open Your Design in Canva?
Access the Canva editor by logging into your account, navigating to the Projects folder, and selecting your design file.
The design canvas opens with the full toolbar visible at the top of the screen.
Action
- canva.com > Log In: Enter your credentials or use Google/Facebook sign-in
- Left sidebar > Projects: Locate your existing design file
- Click design thumbnail: Editor workspace loads with all design elements
Purpose
The Canva editor interface provides access to the Effects panel and text formatting options needed for highlighting.
Step Two: Where Do You Find the Text Element to Highlight?
Click directly on any text box in your design to select it.
Blue selection handles appear around the text element, and the top toolbar updates with text-specific editing options.
Action
- Design canvas: Click the text box you want to highlight
- Selection handles: Confirm blue border appears around text element
- Top toolbar: Verify text editing options are now active
Purpose
Proper text selection activates the Effects panel where the background effect controls are located.
Without selecting the text element first, highlight options remain hidden.
Step Three: How Do You Add a Highlight Effect Using the Effects Panel?
With your text selected, click the Effects button in the top toolbar to open the effects panel, then toggle on the Background option to apply a colored highlight behind your text.
Action
- Top toolbar > Effects: Click to open the effects panel on the left side
- Scroll to Background: Locate the background effect option in the panel
- Toggle Background ON: Text displays with default highlight color applied
Purpose
The Background effect creates a text background color that follows the shape of your text.
This differs from placing a shape behind text because it automatically adjusts when you edit the text content.
Step Four: How Do You Customize the Highlight Color?
Click the color swatch in the Effects panel to open the color picker and select your preferred highlight color using presets, hex codes, or the color spectrum.
Action
- Effects panel > Color swatch: Click the colored square next to Background
- Select color method: Choose from default colors, document colors, or enter RGB hex code (example: #FFFF00 for yellow)
- Preview on canvas: Highlight color updates in real-time
Purpose
Custom colors ensure your text highlight matches your color palette and brand identity.
Document colors pull from existing design elements for quick consistency.
Step Five: How Do You Adjust Highlight Roundness and Spread?
Use the Roundness slider to control corner curvature (0-100) and the Spread slider to adjust padding around your text (0-100).
Action
- Roundness slider: Drag right for rounded corners, left for sharp edges (0 = square, 100 = pill shape)
- Spread slider: Increase value to add more padding around text characters
- Real-time preview: Watch changes apply directly on canvas
Purpose
Roundness affects the visual style. Sharp corners feel modern; rounded corners feel friendly.
Spread controls breathing room between text and highlight edges.
Alternative Method: How Do You Create a Highlight Using a Shape Behind Text?
Add a rectangle shape from the Elements panel, position it behind your text using layer arrangement, then customize the shape color and size manually.
Action
- Left sidebar > Elements: Search “rectangle” and drag shape to canvas
- Position shape: Move behind text, right-click > Send to back
- Adjust dimensions: Resize shape to fit text boundaries
- Change color: Click shape, select fill color from toolbar
Purpose
The shape method offers independent control over highlight dimensions and supports gradient fills.
Useful when you need highlight shapes that extend beyond text boundaries.
Method Comparison
| Criteria | Effects Panel Method | Shape Method | | — | — | — | | Steps required | 3 steps | 5 steps | | Auto-adjusts with text | Yes | No | | Gradient support | No | Yes | | Best for | Quick edits, dynamic text | Custom shapes, fixed layouts |
Use Effects Panel when text content may change.
Use Shape method when you need precise control over highlight boundaries or gradient colors.
How to Verify the Highlight Applied Correctly
Check that your highlight displays properly before exporting.
- Zoom to 100%: View > Zoom to 100% or press Ctrl/Cmd + 0
- Preview mode: Click Present button to see full-screen preview
- Check all pages: Navigate through multi-page designs
- Test export: Download as PNG to verify highlight renders correctly
Troubleshooting
Issue: Background option not visible in Effects panel
Solution: Ensure you selected a text element, not an image or shape. Click directly on text, then reopen Effects panel.
Issue: Highlight color doesn’t match brand colors
Solution: Copy hex code from your brand style guide and paste into the color picker field. Canva Pro users can access Brand Kit colors directly.
Issue: Highlight overlaps other design elements
Solution: Select highlighted text > Position > Arrange > Send backward until properly layered. Check visual hierarchy across all elements.
Issue: Highlight appears pixelated on export
Solution: Export at higher resolution. Select Share > Download > PNG > check “Transparent background” if needed.
Related Processes
Expand your Canva text skills with these related guides:
- How to curve text in Canva for creative text shapes
- How to flip text in Canva for mirror effects
- How to change background color on Canva for full canvas styling
- How to group in Canva to move highlighted text with other elements
- How to make a logo in Canva using highlighted text techniques
FAQ on How To Highlight Text In Canva
Can you highlight text in Canva Free?
Yes. The Background effect in the Effects panel works on both free and paid accounts.
Access the text effect settings, toggle Background on, and customize color, roundness, and spread without upgrading.
Where is the Effects panel in Canva?
Select any text element on your design canvas. The Effects button appears in the top toolbar.
Click it to open the panel on the left side with Background, Shadow, Lift, and other text styling options.
Why can’t I see the highlight option in Canva?
The Background effect only appears when a text box is selected. If you clicked an image or shape, the option stays hidden.
Click directly on text, then check the Effects panel again.
How do I change the highlight color in Canva?
Open Effects panel, enable Background, then click the color swatch. Choose from default colors, enter a hex code, or select from document colors.
Changes preview in real-time on your design.
Can I add a gradient highlight to text in Canva?
The Effects panel Background feature supports solid colors only. For gradient or analogous color highlights, use the shape method.
Place a rectangle behind text and apply gradient fill to the shape.
How do I make the highlight rounded in Canva?
Use the Roundness slider in the Effects panel after enabling Background. Drag right toward 100 for pill-shaped corners.
Drag left toward 0 for sharp, rectangular edges.
What does the Spread slider do for text highlights?
Spread controls padding between your text characters and the highlight edges. Higher values create more breathing room around letters.
Lower values keep the highlight tight against the text.
How do I highlight only part of a text box in Canva?
The Background effect applies to the entire text element. To highlight specific words, create separate text boxes for each section.
Apply highlights to individual boxes, then align them for a cohesive look.
Does the text highlight export correctly to PNG and PDF?
Yes. Background effects render properly in PNG, JPG, and PDF exports from Canva.
Check your preview before downloading to confirm highlight colors display as expected.
Can I save a highlighted text style as a template in Canva?
Canva doesn’t save text effects as reusable styles. Copy your highlighted text element and paste it into new designs to maintain consistent formatting.
Brand Kit stores fonts and colors but not effect settings.
Conclusion
You now know how to highlight text in Canva using both the Effects panel and the shape method.
The Background effect handles most situations. Quick, automatic, updates when you edit text.
The shape method gives you more control over dimensions and supports gradient fills for custom designs.
Play with the Roundness and Spread sliders to match your project’s style. Sharp corners for corporate work. Rounded edges for casual content.
Color choice matters too. Pull from your existing design palette or use complementary color schemes to make text pop against backgrounds.
Text highlights improve readability and guide viewers to key information. Use them strategically across your presentations, social graphics, and marketing materials.
Start with one design. Test different highlight styles. Find what works for your brand.

Renowned for his expertise in logo design and visual branding, Bogdan has developed a multitude of logos for various clients.
His skills extend to creating posters, vector illustrations, business cards, and brochures. Additionally, Bogdan's UI kits were featured on marketplaces like Visual Hierarchy and UI8.
He also wrote in the past years on sites like Design Your Way, WebDesignerDepot, WPDean, Designmodo, Speckyboy, Slider Revolution, and more.
- The Windsurf Logo History, Colors, Font, And Meaning - 10 October 2026
- How to Remove Background From Product Photos (No Photoshop) - 10 October 2026
- How Designers can Build a Stronger Online Creative Identity - 9 October 2026

Bogdan Sandu is a seasoned designer who has been designing websites since 2008. Renowned for his expertise in logo design and visual branding, Bogdan has developed a multitude of logos for various clients. His skills extend to creating posters, vector illustrations, business cards, and brochures. Additionally, Bogdan's UI kits were featured on marketplaces like Visual Hierarchy and UI8. He also wrote in the past years on sites like Design Your Way, WebDesignerDepot, WPDean, Designmodo, Speckyboy, Slider Revolution, and more.
You Might Also Like