


That shiny logo on a matte business card. The glossy title on a book cover that catches the light at just the right angle. That is spot UV coating at work.
It is one of the most effective print finishing techniques available, and one of the most misunderstood. Designers spec it without fully knowing how it works. Print buyers order it without knowing what can go wrong.
This guide covers everything from the UV curing process and artwork setup to paper stock compatibility, finish types, and common production defects, so you can use it with confidence on your next packaging or print project.
What is Spot UV Coating

Spot UV coating is a print finishing technique that applies a clear, glossy varnish to specific areas of a printed surface. Unlike full-bleed UV coating, which covers the entire sheet, spot UV targets only the zones you define. A logo, a headline, a product image. Everything else stays as-is.
The “spot” in the name refers exactly to that: selective, targeted application rather than overall coverage.
UV stands for ultraviolet. The varnish cures instantly when exposed to a UV lamp, hardening on contact rather than air-drying like aqueous coatings. That instant-cure process is a big part of what makes the finish so clean and durable.
The global UV spot coating packaging market was valued at $2.3 billion in 2024, with projections to reach $4.8 billion by 2033 at a CAGR of 8.2% (Market Intelligence, 2024). That kind of growth doesn’t happen without a real reason.
The reason is contrast. Spot UV works best when it sits on top of a matte laminated surface, where the gloss-versus-matte interplay catches light differently depending on the viewing angle. The result is a finish that reads as premium without being loud about it.
Common substrates include coated card stock, paperboard, and laminated surfaces. You’ll see it most often on packaging design, business cards, and book cover design.
Spot UV is a finishing step applied after the main print run, not during it. The base print comes first. The UV varnish layer is applied on top as a separate pass.
—
How Spot UV Coating Works
The process starts before anything hits a press. Artwork needs to be set up with a separate layer specifically for the UV coating, clearly separated from the main print file.
Preparing the Artwork File for Spot UV
Most printers ask for two files: the main color artwork and a second file that shows only the spot UV areas as solid black on a white background.
In Adobe InDesign or Illustrator, the standard approach is to create a new swatch named “Spot UV,” set it as a spot color type at 100% black (K only, with C, M, Y at 0%), and apply it to a duplicate of every element you want coated. That duplicate layer sits on top of the main artwork.
- Set raster effects to 300 DPI minimum
- Work in CMYK color mode, not RGB
- Apply overprint fill to the spot UV layer objects
- Export as PDF and verify separations using Output Preview in Acrobat
One thing that catches people out: the spot UV swatch needs to be named consistently. If your printer expects “Spot UV” and you’ve named it “UV Gloss,” the pre-press team will either catch it or it will cause a plate error. Worth confirming before you send files.
The Printing and Curing Process
Two-pass production: base print runs first, spot UV varnish applied second.
In traditional screen-based production, a silk screen or plate transfers the UV varnish only to the defined areas. In digital spot UV, a dedicated UV head deposits the varnish directly from the file data, which makes short runs more accessible (and cheaper to set up).
Once applied, the coated sheet passes under a UV lamp. The photochemical curing process hardens the varnish almost instantly, which is why UV coatings produce sharper edges and a harder finish than air-dried alternatives.
The spot cure segment accounted for more than 45% of the UV curing systems market in 2023, driven by the efficiency of targeted, high-intensity curing over specific areas (S&S Insider, 2024).
Registration accuracy is critical at this stage. The UV layer must align precisely with the printed element underneath. Even a half-millimeter shift is visible, especially on fine text or logos.
—
Types of Spot UV Finishes
Not all spot UV looks the same. The coating type you choose changes both the visual and tactile output significantly.
| Finish Type | Appearance | Tactile Feel | Best Used On |
| Gloss spot UV | High shine, reflective | Smooth, glass-like | Logos, product names, photography |
| Matte spot UV | Subtle sheen, soft contrast | Slightly silky | Text, background patterns |
| Raised/3D spot UV | Visible texture depth | Distinctly raised | Premium packaging, special editions |
| Soft-touch spot UV | Low gloss, velvety look | Velvet-like surface | Luxury goods, cosmetics packaging |
| Pearlescent UV | Iridescent shimmer | Smooth with visual depth | Wedding stationery, beauty brands |
Gloss Spot UV
The most common option. It produces a sharp, reflective finish that reads as premium against matte backgrounds. If someone shows you a business card with a shiny logo and a flat card body, that’s gloss spot UV.
Works best when the contrast between coated and uncoated areas is strong. Low-contrast applications (gloss UV on a glossy laminate, for example) produce almost no visible effect.
Raised and Soft-Touch Variants
Raised UV builds multiple varnish layers in the same pass to create a tactile, three-dimensional surface. You can feel the edges of the design with your fingertip.
Luxury candle brand Diptyque uses raised UV on its folding cartons to add tactile depth that matches the sensory richness of its products.
Soft-touch UV is less about shine and more about feel. The finish resists fingerprints, which makes it a reliable choice for cosmetics and premium packaging where handling is frequent.
UV coatings in the digital printing space accounted for 36% of global coating volume in 2023, second only to water-based coatings at 47% (Market Growth Reports, 2023).
—
Spot UV vs. Other Coating and Finishing Options
Spot UV does not exist in isolation. Most print finishing decisions involve comparing it against foil stamping, embossing, aqueous coating, or full UV. Each has trade-offs worth knowing before you commit to a spec.
Spot UV vs. Full UV Coating
Full UV covers the entire surface. Spot UV covers only the areas you define.
Full UV is faster and cheaper per unit at high volumes, but you lose the gloss-versus-matte contrast that makes spot UV effective. If the whole sheet is shiny, there is no visual contrast to work with.
Key difference: spot UV is a design tool. Full UV is a protective finish. They serve different purposes.
Spot UV vs. Foil Stamping
| Factor | Spot UV | Foil Stamping |
| Visual effect | Gloss or texture contrast | Metallic or colored foil |
| Setup cost | Lower (screen or digital) | Higher (die required) |
| Color options | Clear only (standard) | Wide range of foil colors |
| Tactile feel | Raised possible | Slight impression |
| Best for | Subtle premium finish | Metallic brand identity |
Spot UV is generally more cost-effective than foil stamping in design, offering similar premium impact at lower setup cost. Both can be combined on the same piece, though that increases production complexity and budget considerably.
Spot UV vs. Embossing and Aqueous Coating
Embossing and debossing create raised or recessed areas in the substrate itself, without adding a coating. Spot UV adds a surface layer. You can combine them, but they work through different physical mechanisms.
See also: embossing vs. engraving for a closer look at those distinctions.
Aqueous coating is water-based, air-dried, and applied flood or spot. It offers less visual impact than UV but is more environmentally friendly and compatible with a wider range of substrates. It also costs less. For functional protection without premium aesthetics, aqueous is fine. For visual impact, UV wins.
Worth reading alongside this: varnish vs. lamination in print and spot varnish vs. flood varnish.
—
Best Use Cases for Spot UV Coating
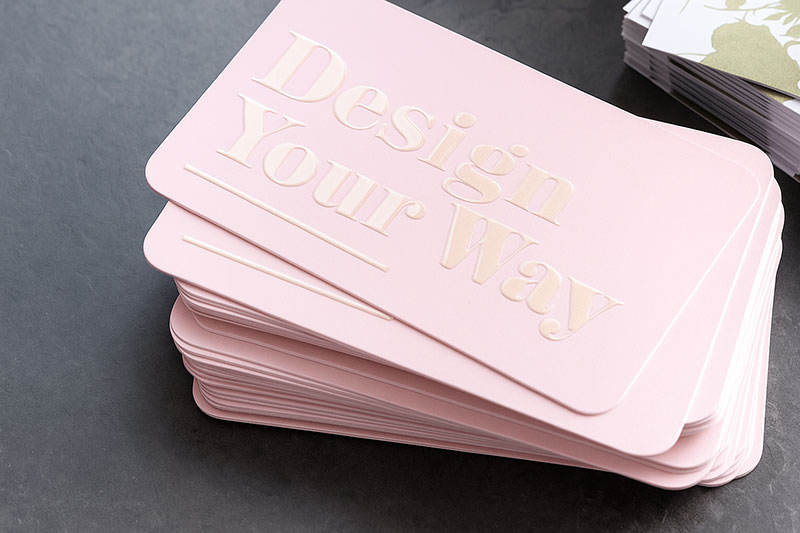
Spot UV works best when you have a clear design element worth highlighting and a contrasting background to highlight it against. The more defined that contrast, the stronger the result.
Packaging
This is where spot UV gets used most. Cosmetics, luxury goods, food and beverage, electronics. Any product category where premium shelf presence matters.
CHANEL applies gloss spot UV to its iconic logo on folding carton boxes, using the contrast between the shiny logo and matte black background to reinforce brand positioning without adding color.
The UV spot coating packaging market is growing fastest in Asia-Pacific, with a projected CAGR of 10%+ through 2033, driven by demand from cosmetics and premium consumer goods sectors (Market Intelligence, 2024). North America currently leads with nearly 34% of global market share.
Business Cards and Marketing Collateral
A business card with a spot-UV logo on a matte laminated surface is one of the most practical applications. The card costs more to produce, but the tactile difference is immediate and memorable.
- Business cards: name, logo, or job title highlighted
- Brochures and presentation folders: cover elements or key headlines
- Postcards and direct mail: call-to-action areas
Research from the Journal of the Academy of Marketing Science found consumers associate luxury packaging with superior product quality and are more willing to pay a premium for it. Spot UV is one of the more accessible ways to signal that quality.
Book Covers and Publishing
Publishers use spot UV to make titles or cover illustrations stand out, particularly on special editions or hardcover releases where the finish helps justify a higher retail price.
Blind spot UV is a specific technique where the varnish is applied over an area that matches the substrate color underneath. You don’t see it at a glance. You feel it. Popular for subtle brand texture on packaging where overt decoration would undermine the aesthetic.
—
Design Considerations for Spot UV
Spot UV rewards careful design decisions. It punishes careless ones. These are the factors that actually determine whether a spot UV application works.
Contrast is the Core Principle
Spot UV needs contrast to be visible. The standard approach is to apply it over a matte laminated surface, where the gloss-matte difference is sharp and reads cleanly under most lighting conditions.
Apply spot UV on top of a gloss laminate and the effect nearly disappears. This is a common and expensive mistake.
Substrate recommendation: soft-touch or standard matte laminate gives the strongest contrast base for gloss spot UV.
Minimum Feature Size and Fine Detail
Thin lines below 0.5pt and very small text tend to lose definition during the UV application. The varnish can spread slightly at fine edges, blurring the result.
If your design relies on delicate detail, test with a physical proof before committing to a full run. Asking to see a wet proof isn’t demanding. It’s just sensible.
Registration tolerance between the base print and the spot UV layer typically runs within +/- 0.5mm on most commercial presses. Design elements with tight alignment to other features need to account for that range.
Over-Applying the Coating
Less is usually more with spot UV. Coating too much of the surface area reduces contrast, defeats the selective-highlight purpose, and starts to look like a failed attempt at full UV coating rather than a deliberate design choice.
- Highlight 1-2 key elements per design, not every element
- Use it to draw the eye toward what matters most
- Treat it the way you’d treat emphasis in layout: one strong focal point beats five competing ones
The focal point principle applies directly here. Spot UV is most effective when it reinforces a single clear visual priority rather than being scattered across multiple elements.
Color choices affect the result too. Dark backgrounds, especially dark matte laminates, produce the strongest visual contrast. Light or white backgrounds with light-colored printing underneath the spot UV tend to underperform unless the design is intentionally subtle.
Cost Factors for Spot UV Coating
Spot UV adds cost to a print job. How much depends on a handful of variables that compound quickly when combined.
Spot UV coating for books typically runs $0.50 to $1.50 per unit at standard commercial volumes (Woodbridge Publishers, 2024). For packaging runs, that number shifts based on surface area, substrate, and whether the application is digital or screen-based.
Setup Costs and Print Volume
Screen-based setup: requires a plate or silk screen, which adds a one-time cost before any units are produced. That setup cost gets spread across the run, so short runs carry a higher effective cost per piece.
Digital spot UV: no plate required. Better for runs under a few hundred units. Per-unit cost stays higher than screen at large volumes, but the break-even point has dropped significantly as digital UV equipment has improved.
Over 65% of signage producers have partially or fully moved into digital UV printing workflows, driven by the elimination of plate-making and faster turnaround (AndresJet, 2025). The same shift is happening in commercial print finishing.
What Drives the Final Price
Substrate choice matters more than most buyers expect. A heavier, coated stock with a premium laminate underneath costs more than a standard coated sheet, but it also produces a better result.
- Soft-touch laminate base: higher cost, strongest visual contrast
- Standard matte laminate: mid-range cost, reliable performance
- Uncoated stock: often not compatible with traditional spot UV at all
Combining spot UV with other finishes, like foil stamping or embossing, increases total cost considerably. Each additional finishing step adds its own setup, run time, and registration requirement.
For short runs where budget is tight, a high-build spot UV can imitate a metallic sheen without the die cost of foil stamping, keeping turnaround to roughly 3-4 days (GotPrint, 2026).
Digital vs. Screen: A Cost Comparison
| Factor | Digital Spot UV | Screen-Based Spot UV |
| Setup cost | None (file-driven) | Plate or screen fee |
| Best run size | Under ~500 units | 500+ units |
| Per-unit cost at volume | Higher | Lower |
| Turnaround | Faster | Longer setup time |
Apple uses spot UV on iPhone packaging to highlight the Apple logo against a matte laminated background. At the volumes Apple prints, screen-based UV is the only economically sensible approach.
—
Spot UV Coating and Paper Stock Compatibility
Not every substrate works with spot UV. Getting this wrong wastes money and produces a finish that either looks poor or fails to adhere at all.
Coated vs. Uncoated Stock
Traditional spot UV requires a coated surface to sit on top of. It cannot be applied directly to uncoated, textured, or porous paper without a primer layer first.
The porosity of uncoated paper causes the varnish to absorb into the substrate rather than sitting on the surface, which destroys the gloss effect (Flexpress, 2022). Multiple layers plus a primer are needed to compensate, which adds cost and complexity.
Practical rule: if you want spot UV on uncoated or textured stock, clear gloss foil stamping is a cleaner alternative. It achieves a near-identical visual result without the adhesion problem.
See also: uncoated vs. coated paper stock and paper finishes explained for a broader look at how substrate choice affects finishing decisions.
Weight and Thickness Requirements
Spot UV does not perform well on substrates thinner than approximately 175 gsm (Flexpress, 2022). Thin stock flexes too much during handling, which can cause the cured varnish to crack.
- 175-300 gsm coated board: standard range for most spot UV applications
- 300+ gsm: preferred for business cards and premium packaging
- Below 175 gsm: risk of cracking and delamination, especially with raised UV
For more on how weight relates to feel and performance: paper weight vs. thickness.
Laminate Compatibility and the Soft-Touch Base
Soft-touch laminate is the go-to base for spot UV. It provides the strongest visual contrast, resists fingerprints, and gives the coating a clean surface to bond to.
Standard matte laminate works well too. Gloss laminate eliminates most of the contrast effect and is generally not worth the added cost of the UV step.
One thing to watch: raised spot UV placed within 1.5-3 mm of a fold, score, or page edge is likely to crack when the piece is finished and trimmed. Keep UV areas well clear of any fold lines.
Also worth reviewing when speccing a job: matte vs. glossy paper and paper types in print design.
—
Spot UV Coating Quality Issues and How to Avoid Them
Most spot UV problems are preventable. They fall into a few consistent categories that print buyers and designers should know before a job goes to press.
Misregistration
Registration accuracy sits within roughly +/- 0.5-1 mm on most commercial presses. A 1 mm shift between the base print and the UV layer is enough to cause visible misalignment, especially on fine text, thin logos, or elements with tight placement relative to other design features (Flexpress, 2022).
Design-side prevention: keep spot UV away from very fine lines and small enclosed letterforms. The varnish can fill in counters on small type.
Production-side prevention: always request a physical wet proof before committing to a full run, particularly on high-value packaging jobs.
Surface Texture Defects
Orange peel texture happens when the UV varnish cures unevenly, leaving a dimpled surface instead of a smooth gloss finish. It is caused by incorrect viscosity, improper conveyor speed through the UV lamp, or temperature fluctuations during application (Bergen County Printers, 2025).
The fix is process control at the printer’s end. If you receive sheets with orange peel, it is a production error, not a design error. Push back and request a rerun.
Yellowing and Delamination
Yellowing: low-quality UV varnish formulations can degrade over time, particularly when the finished piece is stored in direct light. Affects brand longevity on packaging and marketing materials.
Delamination: the coating lifts away from the substrate. Most often caused by incompatible laminate and UV varnish chemistry, or insufficient surface preparation before application.
- Ask your printer which UV varnish brand they use on premium jobs
- Confirm the laminate and UV coating are from compatible product lines
- Avoid raised UV near folds or cut edges where mechanical stress is highest
In high-volume cosmetics box production, UV coatings serve a functional role beyond aesthetics. They reduce product returns by protecting surfaces through distribution handling (Gentlever, 2024). A delamination failure in that context is not just a quality issue, it is a logistics problem.
For a broader look at how these production decisions connect to the overall print workflow, the following are worth reviewing alongside this: what is a print color profile, color proofing for print, and how to set up a print-ready file.
FAQ on Spot UV Coating Explained
What is spot UV coating?
Spot UV coating is a print finishing technique that applies a clear, glossy varnish to specific areas of a printed surface. It cures instantly under ultraviolet light, creating a hard, high-gloss finish on targeted zones while the rest of the surface stays unchanged.
How is spot UV different from full UV coating?
Full UV covers the entire sheet. Spot UV targets only defined areas, creating a gloss-versus-matte contrast that makes logos, images, or text visually stand out. That contrast is the whole point. Full UV eliminates it.
What paper stock works best with spot UV?
Coated stock on top of a matte or soft-touch laminate gives the strongest result. Traditional spot UV does not adhere well to uncoated or porous paper without a primer layer. Minimum recommended substrate weight is around 175 gsm.
Can spot UV be applied to uncoated paper?
Not directly. Uncoated paper absorbs the varnish before it can cure properly on the surface. Clear gloss foil stamping is a reliable alternative for uncoated and textured stocks that need a similar visual effect.
What are the main types of spot UV finishes?
The most common options are gloss, matte, raised 3D, soft-touch, and pearlescent UV. Gloss spot UV is the standard. Raised UV builds tactile depth. Soft-touch produces a fingerprint-resistant, velvety surface popular in cosmetics packaging.
How do I set up artwork for spot UV?
Create a separate layer named “Spot UV” in InDesign or Illustrator, set as a spot color at 100% black. Supply it as a second PDF alongside your main color file. Work in CMYK at 300 DPI minimum.
What causes spot UV misregistration?
The UV varnish layer shifts relative to the base print, usually by 0.5-1 mm. Fine lines, small text, and tight design elements amplify the problem. Always request a physical proof before committing to a full production run.
Is spot UV more expensive than other print finishes?
More than aqueous coating, yes. Cheaper than foil stamping in most cases. Screen-based spot UV has plate setup costs that favor high volumes. Digital spot UV skips plate costs, making short runs more practical and budget-friendly.
What common quality problems affect spot UV?
Misregistration, orange peel texture, yellowing over time, and delamination from incompatible laminates. Most are production errors, not design errors. Requesting a wet proof and confirming laminate-varnish compatibility beforehand prevents the majority of issues.
Where is spot UV coating used most?
Luxury packaging, business cards, book covers, and marketing collateral. Cosmetics, premium consumer goods, and publishing rely on it heavily. Any printed piece where a tactile, high-contrast finish helps communicate quality or direct the viewer’s eye.
Conclusion
This conclusion is for an article presenting spot UV coating as a print finishing technique worth understanding properly before you spec it.
The UV curing process, substrate compatibility, coating thickness, and registration accuracy all affect whether the final result looks intentional or rushed.
Used well, selective varnish application adds real tactile value to book covers, business cards, and luxury packaging alike.
Used carelessly, it produces misregistration, delamination, or a gloss effect that nobody notices because the contrast was never there to begin with.
Get the paper stock right, set up your artwork file correctly, and request a physical proof. Those three steps prevent most problems.

Renowned for his expertise in logo design and visual branding, Bogdan has developed a multitude of logos for various clients.
His skills extend to creating posters, vector illustrations, business cards, and brochures. Additionally, Bogdan's UI kits were featured on marketplaces like Visual Hierarchy and UI8.
He also wrote in the past years on sites like Design Your Way, WebDesignerDepot, WPDean, Designmodo, Speckyboy, Slider Revolution, and more.
- Canva vs Photoshop: When Does Each Make Sense? - 12 September 2026
- Briefing 3D Game Animation: Rigs, Clip Lists and Engine Handoffs - 11 September 2026
- The Webflow Logo History, Colors, Font, And Meaning - 10 September 2026

Bogdan Sandu is a seasoned designer who has been designing websites since 2008. Renowned for his expertise in logo design and visual branding, Bogdan has developed a multitude of logos for various clients. His skills extend to creating posters, vector illustrations, business cards, and brochures. Additionally, Bogdan's UI kits were featured on marketplaces like Visual Hierarchy and UI8. He also wrote in the past years on sites like Design Your Way, WebDesignerDepot, WPDean, Designmodo, Speckyboy, Slider Revolution, and more.
You Might Also Like


