


Some print finishing techniques add polish. Foil stamping adds presence.
It is one of the few processes in print design that changes how a piece behaves under light, not just how it looks on screen. That difference is why it shows up on luxury packaging, book covers, business cards, and brand collateral where first impressions carry real weight.
This article covers how foil stamping works, which foil types and substrates produce the best results, how combo stamping with embossing differs from flat foil work, what artwork requirements actually matter, and where the process breaks down when something goes wrong.
If you are specifying foil stamping for the first time or troubleshooting a job that did not come out right, this is the reference you need.
What is Foil Stamping

Foil stamping is a print finishing process that transfers metallic, pigmented, or holographic foil onto a surface using heat, pressure, and a custom metal die. The die contacts the foil carrier film, the adhesive layer activates under heat, and the foil bonds permanently to the substrate. When the die lifts, the carrier film peels away clean.
It is not the same as metallic ink printing. Foil is a physical film layer. Metallic ink sits on the surface and produces a flatter, less reflective result. Foil produces a sharper optical effect and works on dark paper stocks where ink cannot achieve the same contrast.
The global hot stamping foil market was valued at USD 1.3 billion in 2023 and is projected to reach USD 2.5 billion by 2032, growing at a CAGR of 7.1% (DataIntelo). That kind of growth does not come from novelty. It comes from consistent, proven results across packaging, publishing, and brand collateral.
Foil stamping belongs to a broader family of graphic design terms and print embellishments that includes embossing vs engraving, spot UV coating, and spot varnish vs flood varnish. Each produces a different tactile and visual outcome. Foil stamping is the only one that adds a reflective metallic or holographic film layer to the surface.
Hot Foil Stamping vs. Cold Foil Stamping
Hot foil stamping uses a heated die pressed directly onto the foil and substrate simultaneously. Temperature typically runs between 200-300 degrees Fahrenheit depending on foil type and substrate. It produces sharp, precise results and works well with fine detail.
Cold foil stamping skips the heat entirely. A UV-curable adhesive is printed onto the substrate first, the foil is applied over it, and a UV lamp cures the bond. It runs inline on offset presses, which makes it faster for high-volume work.
| Feature | Hot Foil Stamping | Cold Foil Stamping |
| Heat required | Yes, 200°F–300°F | No |
| Die needed | Custom metal die | Printed adhesive pattern |
| Production speed | Moderate | High (inline press) |
| Detail quality | Very high | Good, less sharp on fine detail |
| Best for | Short-medium runs, luxury work | High-volume commercial printing |
Hot foil stamping machines retained 41.89% of the embossing and foil stamping equipment market share in 2024, according to Mordor Intelligence. Cold foil digital units are growing at an 8.13% CAGR and continue to outpace legacy equipment.
—
How the Foil Stamping Process Works
The process has five stages. Each one affects the final result. Skipping or rushing any stage is where most defects originate.
Stage 1: Die creation. A metal die is machined to match the design. This is the most critical production step. The die defines every edge, corner, and detail that will appear in the finished foil.
Stage 2: Substrate preparation. The surface must be clean, flat, and compatible with the chosen foil. Any contamination or inconsistency in the sheet surface will show up in the final stamp.
Stage 3: Temperature and pressure setup. The press operator sets die temperature and dwell time (how long the die contacts the foil). Too hot and the foil spreads beyond the die edge. Too cool and adhesion fails.
Stage 4: Foil transfer. The die contacts the foil carrier film and substrate simultaneously. Heat activates the adhesive layer. The foil bonds to the substrate in the exact shape of the die.
Stage 5: Carrier film removal. The carrier film (usually polyester) peels away, leaving only the foil layer bonded to the surface. A clean release depends on correct temperature and dwell settings.
Registration accuracy matters most in multi-color foil work. Each foil color requires a separate die and a separate pass through the press. If the substrate moves between passes, the colors misalign. High-speed production lines use servo-controlled sheet feeding to keep registration under 0.1mm.
In 2024, nearly 48% of foil stamping machines sold were digital or hybrid models, offering automated plate alignment and computer-controlled stamping pressure. This shift reduced material wastage by up to 25% and cut downtime by 30% in high-speed lines (Market Reports World).
Inline vs. Offline Production
Offline foil stamping runs as a separate job after printing. The printed sheets go to a dedicated foil press. Most specialty and short-run work uses this approach because it gives more control over settings without slowing down the main press.
Inline foil stamping integrates with the printing press, applying foil as part of the same pass. Faster on paper, but any press stop affects both the print job and the foil job simultaneously.
Practical note: Most premium packaging, book covers, and luxury business cards use offline hot foil stamping. Inline cold foil tends to appear on high-volume commercial labels and folding cartons where speed matters more than absolute precision.
—
Types of Foil Used in Stamping
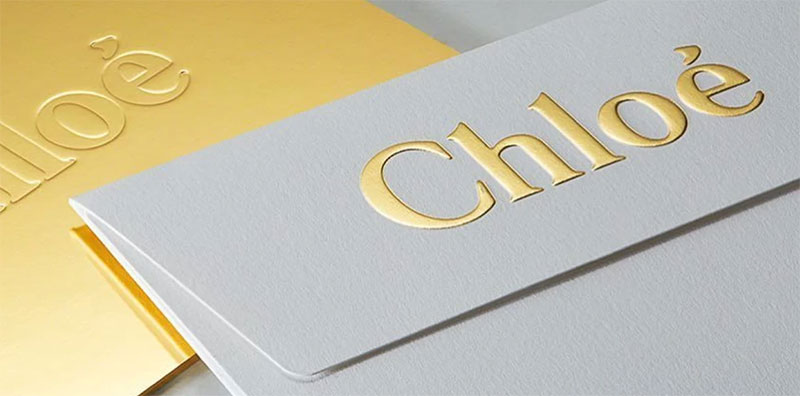
Foil type determines the visual character of the finished piece. Getting this decision wrong is expensive, because you often cannot see the result until after the die is made and the job has run.
The metallic foils segment led the global market, valued at USD 616.60 million in 2023 (Technavio). Gold and silver remain the most specified, but the range of available finishes has expanded considerably.
| Foil Type | Visual Character | Common Use Cases |
| Metallic (gold, silver, copper) | High reflectivity, warm or cool tone | Logos, luxury packaging, book covers |
| Pigment | Opaque solid color, no metal | Brand color matching, dark-on-dark design |
| Holographic | Light-diffracting, rainbow shift | Anti-counterfeit, limited edition packaging |
| Matte metallic | Soft sheen, non-reflective | Minimalist luxury, cosmetics |
| Pearlescent | Soft iridescence, subtle shift | Wedding stationery, beauty packaging |
Metallic Foils
Gold and silver are the defaults for a reason. They carry strong cultural associations with quality and value. The aluminum layer inside the foil is only about 0.02 microns thick, vapor-deposited under vacuum conditions. That thin layer is what produces the high-gloss metallic surface.
Copper and bronze metallics have grown in use over the past few years as brands move away from gold-heavy aesthetics toward warmer, more artisanal-feeling finishes.
Holographic Foils
Holographic foil works through light diffraction rather than reflection. Microscopic grooves etched into the foil structure split incoming light into its spectral components, producing the characteristic rainbow shift.
It requires a very smooth substrate. Uncoated or textured stocks destroy the holographic effect because the surface interrupts the groove alignment. Fenty Beauty has used holographic foil on limited-edition kit packaging specifically for this light-catching effect on shelf.
Pigment and Specialty Foils
Pigment foil contains no metal. It is an opaque colored film, useful when Pantone color matching matters more than metallic effect. White pigment foil on black board, for example, produces a result that opaque white ink cannot match in terms of sharpness.
Specialty options include glitter foils (suspended reflective particles), soft-touch foils (velvet-like tactile finish), and patterned foils with pre-etched surface textures like woodgrain or snakeskin.
—
Substrates Compatible with Foil Stamping
Not every surface accepts foil cleanly. The substrate affects die temperature, dwell time, adhesive formulation, and whether the finished foil will stay bonded through handling and use.
Paper and Cardstock
Coated paper gives the best results for most foil types. The smooth surface allows even contact between die and foil, producing sharp edges and consistent coverage. Standard metallics bond well without special adhesive formulations.
Uncoated and textured papers need a higher-tack adhesive to work the foil into the surface irregularities. Results are possible but less precise. Holographic foil on uncoated stock is particularly problematic. The textured surface breaks up the groove alignment and produces a dull, fragmented image instead of a clean spectral shift.
Paper weight matters. Lightweight stocks (below 80lb text) can buckle under die pressure. Most premium foil stamping work uses 80lb cover weight or heavier.
Specialty and Non-Paper Substrates
Leather foil stamping is widely used in luxury goods. Wallets, journals, and accessories use heat-applied foil for branding. The key is using flexible foil formulations that move with the material rather than cracking at fold points.
Plastics require specific foil chemistry matched to the plastic type. PP, PE, and PVC each need different adhesive formulations. Pre-treatment to raise surface energy (dyne count above 40) is often required.
Soft-touch laminated surfaces present a common problem. The wax-like coating on many soft-touch laminates prevents foil adhesion. UV coatings with high wax content cause the same issue. Aqueous coatings and wax-free varnishes are the better choice when foil stamping is planned for the final piece.
Quick reference for substrate decisions:
- Coated stock, 80lb+: standard metallic foils, no special prep
- Uncoated/textured: high-tack adhesive, avoid holographic
- Soft-touch laminate: test adhesion first, results unreliable
- Leather: flexible formulation, lower temperature setting
- Plastic: match foil chemistry to plastic type, pre-treat if needed
—
Foil Stamping and Embossing Combined
Combining foil stamping with embossing in a single die hit is called combo stamping. The result is a foil-covered, dimensionally raised design. Both visual and tactile. It is one of the most effective print finishing embellishments available for premium work.
Research from Sappi North America and Clemson University found that nearly 60% of participants chose packaging with a foil embellishment when given a direct comparison choice. In the chocolate packaging test, foil preference outweighed product flavor as a decision factor.
Single-Hit vs. Two-Hit Combo
A single-hit combo die stamps and embosses simultaneously. One press pass. The die is engineered with both the foil transfer surface and the dimensional relief built into a single plate.
A two-hit process runs the foil stamp first, then the emboss separately. More passes, more cost, but the result gives greater depth and precision. The emboss can apply more pressure without risk of distorting the foil layer because the foil is already cured from the first pass.
Which to use: Single-hit is fine for shallow relief with bold shapes. Two-hit is worth the added cost when the design has fine detail, deep sculptural depth, or when the foil needs to remain perfectly flat while the emboss rises around it.
Die Design for Combo Work
Combo dies are more complex than flat foil dies. The relief depth needs to be engineered carefully. Too much depth in a single-hit die and the foil stretches and tears at the edges of the raised area.
Brass dies are the practical choice for combo stamping. According to the FSEA Designer’s Guide, brass dies can run over one million impressions and offer the best quality for complex sculptured work. Copper dies handle 50,000-100,000 impressions and work for moderate complexity. Magnesium is the entry-level option, suitable for simpler designs at lower run lengths.
Hershey uses foil stamping and die cutting together on seasonal chocolate box sleeves specifically to create shelf standout in a crowded retail environment. The combination of metallic finish and structural shape works together as a single brand signal.
—
Die Design and Artwork Requirements for Foil Stamping
Artwork that works perfectly on screen can fail completely in foil. The die cannot reproduce every detail that a laser printer or inkjet can. Understanding the physical limits of the process before sending files to the printer saves time, money, and a lot of frustration.
Foil stamping is the only finishing technique where vector files are non-negotiable. The die is machined from the artwork. Any raster element, soft edge, or embedded image cannot be accurately translated into a metal die. Files must be delivered as clean vectors in AI, EPS, or print-ready PDF format.
Minimum Size and Stroke Requirements
The generally accepted minimum stroke width for foil stamping is 0.25pt. Below that, the die cannot hold the detail and the foil fills in or tears.
Type size minimums depend on the typeface. A condensed serif at 6pt will likely fill in between characters. A bold sans-serif at 6pt may work. As a general rule: anything below 8pt needs a press proof before committing to a full run.
- Minimum stroke width: 0.25pt
- Recommended minimum type size: 8pt for most typefaces
- Fine serif type: test at 10pt minimum
- Reverse type (foil knocked out of a field): add 10-15% extra spacing between characters
File Preparation and Trapping
When foil sits adjacent to printed ink on the same piece, trapping adjustments are needed. The foil die is slightly larger than the design element to account for minor registration variance between the print run and the foil pass.
Without trapping, a thin white gap appears between the foil edge and the surrounding ink. It is one of those problems that is almost invisible in a digital proof and very obvious on the printed sheet. Most prepress departments handle this, but knowing it exists helps when reviewing proofs.
Proofing Options
Digital proofs show the foil as a flat color simulation. They are useful for checking layout and composition but cannot show how the actual foil will catch light or how it will read against the substrate color.
A physical press proof is the only reliable check before a full run. It adds cost and time (typically 3-7 business days for die fabrication alone), but it is worth it on complex pieces or when the foil placement is central to the design.
Well-understood graphic design principles like visual hierarchy and focal point apply directly to foil placement decisions. Foil draws the eye. Place it where you want the viewer to look first, not everywhere at once.
Foil Stamping in Packaging Design
Over 34% of global luxury cosmetic brands incorporated hot foil stamping for brand-enhancing effects as of 2024, and foil stamping usage increased by 40% across premium chocolate, wine, and perfume packaging between 2021 and 2024 (Market Reports World).
That number makes sense. Packaging design in luxury categories is not just functional. It signals what the product costs before the customer reads the price.
Packaging and labeling accounted for 45.76% of the embossing and foil stamping equipment market in 2024, according to Mordor Intelligence. No other end-use sector comes close.
How Foil Guides Consumer Attention on Shelf
Foil reflects store lighting. Everything else on the shelf absorbs it. That optical difference is what pulls the eye in a crowded retail environment before the customer has consciously decided to look.
The Luxury Packaging Association (2024) found that over 70% of consumers say packaging influences their perception of a luxury product.
Placement matters as much as the foil itself. A small foil element on a logo or headline does more for shelf findability than full-panel foil coverage, at lower cost. Packola designers flagged this in 2025 reviews: selective foiling outperformed full-coverage foiling for recognition speed.
This connects directly to visual hierarchy decisions in the design process. Foil draws the eye. Put it on the element that earns that attention first.
Structural Considerations Near Folds and Scores
Fold proximity is the most common structural mistake in foil-stamped packaging. Foil placed too close to a crease line will crack when the box is assembled.
General rule: keep foil at least 3mm from any score, fold, or perforation. On thicker board stocks (above 350gsm), increase that to 5mm. The foil film does not flex the same way the substrate does under fold pressure.
Die-cutting compounds the issue. When a foil-stamped area sits near a cut edge, the die-cutting pressure can lift or crack the foil at the edge. Test this on a physical dummy before approving a full production run.
Brand Examples in Luxury Packaging
Estee Lauder uses gold foil stamping on premium skincare packaging, combining metallic finishes with embossed logos to convey quality and heritage. Fenty Beauty applies holographic foil on limited-edition kit packaging for the spectral light-shifting effect that photographs well for social content.
Both approaches serve different brand signals. Gold foil reads as timeless. Holographic reads as current.
Sustainability is now part of the decision. Around 55% of new foil stamping machines sold in 2024 featured eco-friendly foil compatibility (Market Reports World). Recyclability of foil-stamped cartonboard depends on whether the foil can be separated from the fiber during pulping. Hot foil typically releases more cleanly than cold foil laminate during the recycling process.
Foil Stamping Costs and Production Variables
The die is the biggest budget surprise for first-time clients. Every other cost in foil stamping is relatively predictable. The die is not.
Initial die creation ranges from $200 to $1,000 or more depending on design complexity and die material (LeelinePack). Once made, the same die runs for multiple production orders. The setup cost amortizes over time, which changes the cost-per-unit calculation on repeat jobs.
What Drives Cost Up
Multiple foil colors: each requires a separate die and a separate press pass. Two foil colors roughly doubles setup cost and turnaround time.
Design complexity: intricate fine-line artwork requires copper or brass dies rather than magnesium. Brass dies run over a million impressions but cost significantly more upfront.
Short run lengths: the fixed die cost spreads across fewer units, raising the per-piece price. For many shops, labor and setup time outweigh foil material cost on short runs (The Foil Guy, 2026).
Specialty substrates: textured papers, leather, and plastics slow production speed and may require test runs, adding cost before the job even begins.
Digital Foil Stamping as a Short-Run Alternative
Digital foiling eliminates the die entirely. A UV-curable adhesive is applied through an inkjet head, foil is laminated over it, and the adhesive cures under a UV lamp. No metal die. No setup wait. Jobs move from file to finished sheet in hours.
| Factor | Traditional Hot Foil | Digital Foil |
| Die required | Yes, $200–$1,000+ | No |
| Setup time | 3–7 days (die fabrication) | Hours |
| Variable data | No | Yes (per-piece variation) |
| Best run length | Medium to high volume | Short run, prototypes |
| Foil sharpness | Very high | Good, slightly softer edge |
Digital foil setup cost for a first run is significantly lower than a traditional die (Carbon8). For wedding stationery, personalized packaging, or any job where each piece needs a unique foil element, digital foiling is the only practical option.
The trade-off is speed at volume. Digital foiling is slower than high-speed rotary hot stamping. For runs above a few thousand units, traditional foil almost always wins on unit economics once the die cost is spread across the run.
Common Foil Stamping Defects and How to Avoid Them
Most defects in foil stamping trace back to four factors: temperature, pressure, substrate condition, and tooling quality. Get all four right and the process is repeatable. Let any one drift and the whole run suffers.
Understanding where defects come from matters more than memorizing fixes. The same symptom (poor coverage) can have three different root causes, and applying the wrong fix makes it worse.
Poor Adhesion and Patchy Coverage
The foil transfers incompletely. Some areas stick, some do not. This looks like missing patches in solid fill areas or broken coverage across large stamping zones.
Primary causes:
- Die temperature set too low for the foil type or substrate
- Ink on the substrate contains waxes or oils that block foil bonding
- Spray powder residue from the offset press not fully cleared before foiling
- Insufficient dwell time for thick or textured substrates
Raise temperature gradually in small increments. Do not increase pressure as a first response. The surface must be clean and fully dry before foil contact.
Foil Bleeding and Edge Spread
The foil spreads beyond the die boundary. Fine details fill in. Counters in letterforms close up. The finished piece looks soft or blurred rather than sharp.
This is the opposite problem from poor adhesion, but it is caused by the same lever pushed too far. Overheating is the primary cause. The adhesive layer melts past its workable window and flows beyond the die edge.
Drop temperature first. Do not compensate with reduced pressure. Test again with the same dwell time before adjusting any other variable. Increasing pressure when bleeding occurs makes the edges softer, not crisper (CI Official, 2025).
Ghosting and Double Impressions
A faint duplicate image appears alongside the intended foil mark. Looks like a shadow or echo of the main design.
Cause: the die is not mounted securely, or the cushioning material under the die is worn and compressing unevenly. The die bounces slightly on release, making a second, lighter contact.
Check die mounting hardware. Replace any compressed or deteriorated cushioning. Calibrate dwell time to prevent over-pressing. A dwell of 1-2 seconds is the starting point for most paper stocks.
Pre-Press Checks That Prevent Run Failures
Catching problems before a full run starts is cheaper than reprinting. These checks take minutes and prevent the most common failures.
Before running:
- Clean the die surface and remove any wax or ink residue
- Confirm substrate dyne count is above 40 for laminated sheets
- Run 5-10 test sheets and check for adhesion, edge sharpness, and coverage consistency
Check registration on the test sheets before approving. On multi-pass jobs with both print and foil, any registration drift between passes will compound across the full run. Fix it at 10 sheets, not at 10,000.
Understanding print color profiles and color proofing for print applies here too. The foil color under store lighting will differ from how it reads on a monitor or in a digital proof. A physical press proof is the only reliable check for a high-stakes job.
FAQ on Foil Stamping in Design
What is foil stamping in design?
Foil stamping is a print finishing process that uses heat, pressure, and a custom metal die to transfer metallic, pigmented, or holographic foil onto a substrate. It produces a reflective film layer that ink cannot replicate.
What is the difference between hot foil stamping and cold foil stamping?
Hot foil stamping uses a heated die to bond foil directly to the substrate. Cold foil uses a UV-curable adhesive printed first, with foil applied over it and cured by UV light. Hot produces sharper detail. Cold runs faster inline.
What substrates work best for foil stamping?
Coated paper stock at 80lb or heavier gives the most consistent results. Uncoated and textured stocks need high-tack adhesive. Soft-touch laminate is unreliable. Leather, certain plastics, and fabric all work with the right foil formulation.
Can foil stamping be combined with embossing?
Yes. Combining both in a single die hit is called combo stamping. It produces a foiled, dimensionally raised design in one press pass. A two-hit process gives deeper relief and sharper results but costs more.
What file format is needed for foil stamping artwork?
Vector files only. AI, EPS, or print-ready PDF. The die is machined directly from the artwork, so raster elements and soft edges cannot be translated. Minimum stroke width is 0.25pt. Type below 8pt should be press-proofed first.
How much does foil stamping cost?
Die creation runs $200 to $1,000+ depending on complexity and die material. That is a fixed upfront cost. Per-unit price drops significantly at higher run lengths as the die cost spreads across more pieces.
What are the most common foil stamping defects?
Poor adhesion, foil bleeding past die edges, and ghosting are the most frequent problems. Most trace back to incorrect temperature, surface contamination, or worn tooling. Catching them on 10 test sheets beats discovering them mid-run.
What types of foil are available for stamping?
Metallic foils (gold, silver, copper), pigment foils, holographic foils, matte metallics, pearlescent, glitter, and soft-touch specialty finishes. Each produces a different visual result. Holographic requires a smooth coated substrate to work correctly.
Is foil stamping suitable for short print runs?
Traditional hot foil stamping is more cost-effective at medium to high volumes. For short runs, digital foiling skips the die entirely, cuts setup time to hours, and supports variable data. Unit cost is higher but total outlay is lower.
How does foil stamping affect packaging design perception?
Foil reflects store lighting in a way printed ink cannot. Research from Sappi and Clemson University found nearly 60% of consumers chose packaging with a foil embellishment over standard alternatives. It signals quality before the product is handled.
Conclusion
This conclusion is for an article presenting foil stamping in design as a process with real technical depth, not just a decorative afterthought.
Getting it right means understanding the full chain: die material, substrate compatibility, foil selection, stamping temperature, and artwork preparation. Each variable affects the next.
Combo stamping, digital foil alternatives, and specialty finishes like holographic and pearlescent foil have expanded what the process can do. The fundamentals have not changed.
Whether you are specifying premium packaging, a luxury business card, or a foil-blocked book cover, the same rules apply. Sharp vector artwork, the right substrate, and a physical press proof before a full production run.
Done well, metallic foil stamping does something no other print finishing technique achieves. It makes light work for you.
For professional projects, specialist printers like Baddeley Brothers offer the kind of hands-on expertise in foil stamping and luxury print finishing that makes the difference between a good result and a great one.

Renowned for his expertise in logo design and visual branding, Bogdan has developed a multitude of logos for various clients.
His skills extend to creating posters, vector illustrations, business cards, and brochures. Additionally, Bogdan's UI kits were featured on marketplaces like Visual Hierarchy and UI8.
He also wrote in the past years on sites like Design Your Way, WebDesignerDepot, WPDean, Designmodo, Speckyboy, Slider Revolution, and more.
- Canva vs Photoshop: When Does Each Make Sense? - 12 September 2026
- Briefing 3D Game Animation: Rigs, Clip Lists and Engine Handoffs - 11 September 2026
- The Webflow Logo History, Colors, Font, And Meaning - 10 September 2026

Bogdan Sandu is a seasoned designer who has been designing websites since 2008. Renowned for his expertise in logo design and visual branding, Bogdan has developed a multitude of logos for various clients. His skills extend to creating posters, vector illustrations, business cards, and brochures. Additionally, Bogdan's UI kits were featured on marketplaces like Visual Hierarchy and UI8. He also wrote in the past years on sites like Design Your Way, WebDesignerDepot, WPDean, Designmodo, Speckyboy, Slider Revolution, and more.
You Might Also Like


