Making videos used to be hard, and people needed expensive tools and many hours of work. Now, simple video software lets anyone edit videos at home on a normal computer with ease. You can change the colors of your video to make it feel bright and calm.
Using a 3D LUT lets you quickly add a clear and strong color style. These color presets help your clips match each other and save time. This guide explains what 3D LUTS are and shows how to use them in Filmora.
Part 1. What is a 3D LUT and Why It Matters in Color Grading
A 3D LUT is a color preset file that changes colors in video by mapping input colors. It looks at red, green, and blue together, then shifts them into a planned style. Editors using Wondershare Filmora apply these presets to give flat video richer contrast, stronger colors, and cleaner tones. With 3D LUT Filmora, you can quickly add pro color styles without complex manual adjustments.
Why It Matters in Color Grading
Now, let’s see why using these color presets is important for strong, consistent grading results.
- Fast Base Fix: Turn dull, washed‑out log footage into normal, balanced color in one step.
- Camera Match: Make clips from different cameras that share the same color response and contrast easily.
- Style Consistency: Keep every shot in a scene matching the same cinematic tone and atmosphere.
- Skin Tone Control: Protect and enhance skin tones while changing background colors and overall contrast together.
- Repeatable Looks: Save a favorite color style and apply it again in future editing projects.
Part 2. Types of 3D LUT Used in Color Correction and Grading

Different types of LUTs help fix colors, match cameras, and add style during editing work. So, now, we will look at the main 3D LUT types and how they are used.
1. Technical Conversion LUTs
Some LUTs take flat, washed‑out footage and turn it into normal color with better contrast. People usually apply these first, so the video looks natural before any creative color changes.
2. Camera Profile LUTs
For certain cameras, special LUTs are made to match that camera’s normal color response. They help you reach a good starting look quickly, instead of adjusting many sliders by hand.
3. Creative Cinematic LUTs
When you want style, these LUTs give a film look, vintage mood, or strong color theme. After correction, editors use them to shape the final feeling of the scene or project.
4. Matching LUTs
Sometimes, two cameras and scenes look different if they were shot at the same time. A matching LUT brings those shots closer to help the viewer not notice any sudden color change.
5. Fixing LUTs
Certain LUTs address issues such as green light, blue shadows, and strange skin color. They are added as small corrections, cleaning trouble areas while keeping your main grading choices untouched.
Part 3. Learn How to Use Filmora 3D LUT Like a Pro Editor
Many beginners wonder how to grade color like a pro; here, Wondershare Filmora comes in to help. Filmora helps you maximize the texture of the moments you captured with simple, clear tools. It allows you to navigate intuitively with clear selection, so every option is easy to see and use.
Filmora includes powerful color grading features that let you easily adjust and rebuild the color tone. You can apply ready-made presets and create polished-looking videos without deep technical knowledge. With 3D LUT Filmora, beginners get pro‑level color styles while still working in a friendly interface.
Key Features
- Large LUT Library: It offers over 800 carefully crafted LUTs and filters to elevate the look of your videos. From creative color grading to vintage-inspired Fuji style and advanced cinematic filters, find your mood.
- Professional Camera LUTs: With professional camera LUTs, Filmora lets you preserve color and light information. Maintain the unique camera style and easily maximize the texture of your media.
- Audio Ducking: The audio ducking feature lets you professionally fade your music to make dialogues stand out. This feature allows you to emphasize the dialogue in your video effortlessly, complementing your 3D LUT
Step-by-Step Guide to Using Filmora 3D LUT for Beginners
Having explored the key features, many beginners still feel unsure about applying color presets correctly. So, follow the steps below to start using 3D LUT Filmora with confidence:
Step 1. Import Media Files to Timeline
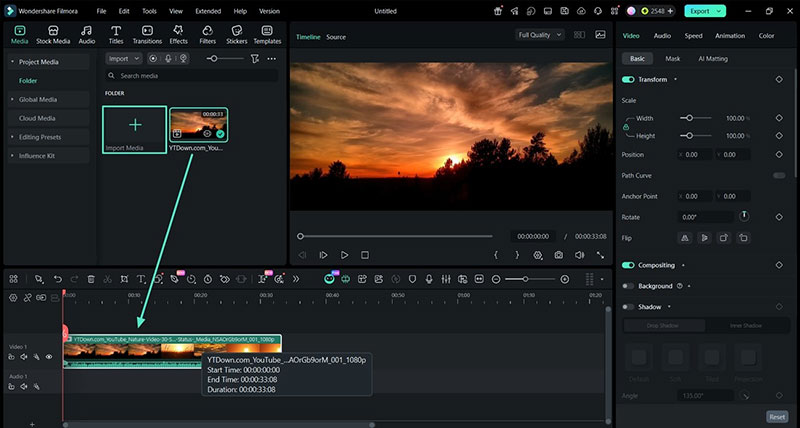
Once you create a New Project on Filmora, click the “Import Media” button. Alternatively, you can drag and drop the media files directly onto the timeline to use them.
Step 2. Access The LUT Settings
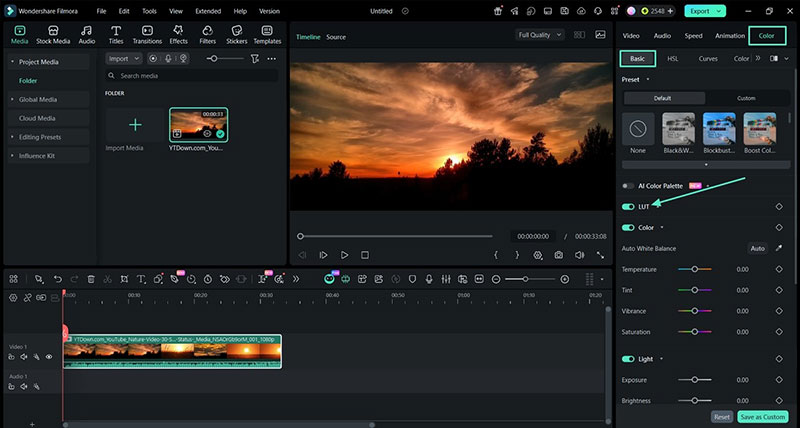
After importing the video, click the “Color” tab in the top right corner and press the “Basic” tab. Next, enable the LUT option to enter the LUT interface.
Step 3. Choose a LUT Preset and Set Its Parameters
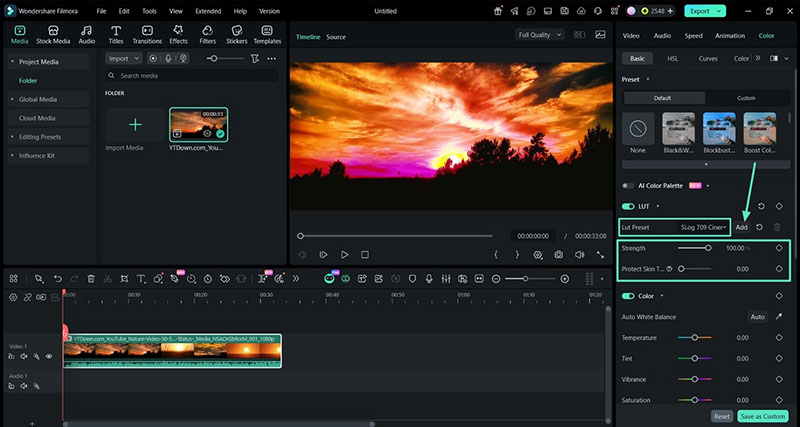
Once you open the LUT settings, choose a preset from the options. Alternatively, you can also add custom 3D LUT presets by clicking the “Add” button. After choosing a LUT Preset, adjust the “Strength” if needed. If your video contains humans, adjust the “Protect Skin Tones” slider.
Step 4. Preview and Export Final Video
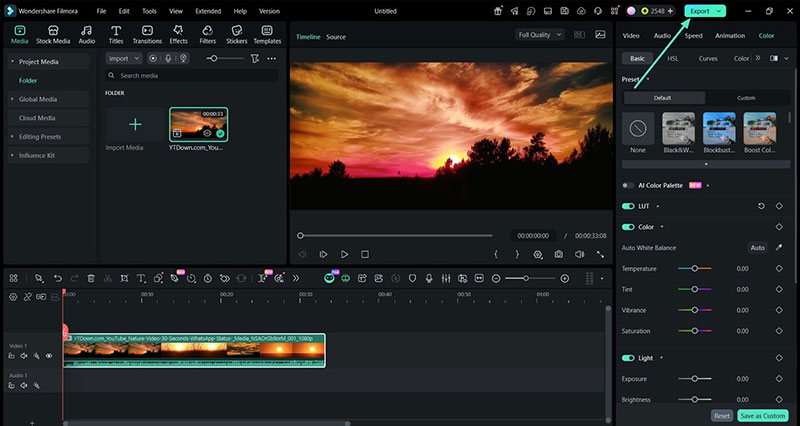
Now, a LUT Preset has been successfully applied to your video. Preview the video and click the “Export” button to save the final results.
Conclusion
In the end, we explored how 3D LUT presets make color grading more powerful for creators. These tools help you repair dull footage, set a clear mood, and keep scenes visually united. Whether you create quick social clips and longer story‑driven videos, the right preset can lift your visuals. If you want an easy editor that handles LUTs and other grading features smoothly, consider using Filmora.

Renowned for his expertise in logo design and visual branding, Bogdan has developed a multitude of logos for various clients.
His skills extend to creating posters, vector illustrations, business cards, and brochures. Additionally, Bogdan's UI kits were featured on marketplaces like Visual Hierarchy and UI8.
He also wrote in the past years on sites like Design Your Way, WebDesignerDepot, WPDean, Designmodo, Speckyboy, Slider Revolution, and more.
- The Windsurf Logo History, Colors, Font, And Meaning - 10 October 2026
- How to Remove Background From Product Photos (No Photoshop) - 10 October 2026
- How Designers can Build a Stronger Online Creative Identity - 9 October 2026

Bogdan Sandu is a seasoned designer who has been designing websites since 2008. Renowned for his expertise in logo design and visual branding, Bogdan has developed a multitude of logos for various clients. His skills extend to creating posters, vector illustrations, business cards, and brochures. Additionally, Bogdan's UI kits were featured on marketplaces like Visual Hierarchy and UI8. He also wrote in the past years on sites like Design Your Way, WebDesignerDepot, WPDean, Designmodo, Speckyboy, Slider Revolution, and more.
You Might Also Like