Creating a video on YouTube is an exciting task, but editing may take a long time, particularly when you are combining jump cuts, effects, background music, and voice-overs. Fortunately, CapCut Desktop Video Editor is the solution to the problems of creators who seek to streamline the workflow without sacrificing quality.
CapCut Desktop Video Editor is simple, with its drag and drop editing features and a bevy of smart tools such as the AI voice generator, auto-captions, and auto-cut tools, CapCut can cut your YouTube editing time by half. Regardless of whether you are a vlogger, teacher, or product expert, CapCut should become your best friend because of its speed and ease.
Why CapCut Desktop Is a YouTuber’s Best Friend
CapCut Desktop Video Editor is made to meet the needs of contemporary video makers. It provides a non-obtrusive, ultra-responsive editing interface that is not bulky to decipher.
It allows batch editing, using templates, creating AI-generated voiceovers, and adding filters or cuts much more quickly than most conventional editing systems. When you have too much content coming on a weekly or even daily basis, speed and ease are priorities.
Step-by-Step: How to Edit YouTube Videos Faster with CapCut Desktop
Let’s walk through a simplified, accurate 5-step workflow for faster editing on CapCut Desktop.
Step 1: Import and Organize All Your Footage
Open CapCut Desktop and select a “New project”. After opening the main editor window, you will see the “Media” panel on the left side of this window, where you need to select the “Import” option to add all your video files, sound tracks, and B-roll.
Pro Tip: Before importing, name your files in simple ways. CapCut stores them in the sequence in which you have added them, making editing go even quicker as you find assets faster.
When your source video is low quality or is blurred, employ the AI video upscaler located in the “Video” tab after the selection of a clip. It also upscales the quality of the resolution and the sharpness automatically–ideal in smartphone-recorded content.

Step 2: Drag Clips to the Timeline and Use Split for Trimming
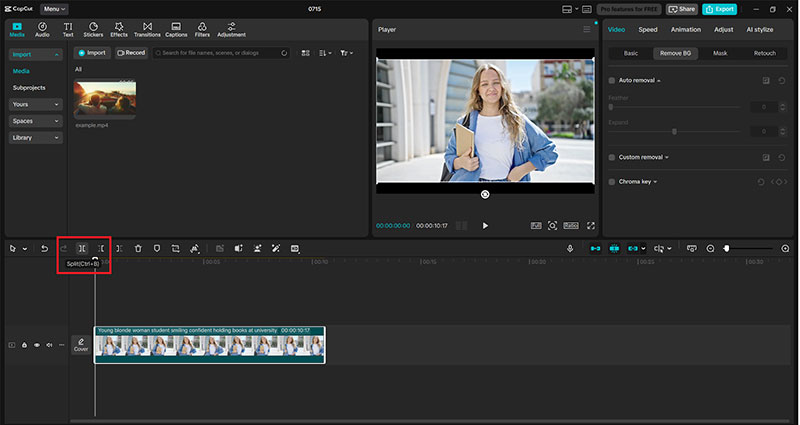
After importing your assets, drag the main video file to the timeline. In order to get rid of unwanted sections rapidly, apply the tool (scissor icon above the timeline) to the places that you would like to cut. Next, choose the undesirable parts and hit the “Delete” key on your keyboard.
Ripple Delete is another way to close the gaps between clips automatically. Right-click on the gap and choose Ripple delete.
When you have more than one camera or screen recordings, add clips in different tracks to manage them better.
Step 3: Add B-Roll, Effects, and Transitions
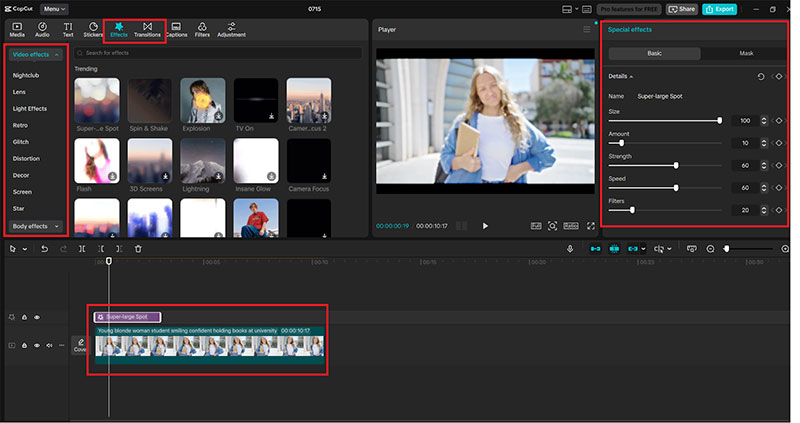
You should add B-roll to maintain the attention of your audience, zoom effects, and cut-to-cut transitions. CapCut also has fast drag and drop transitions at the “Transitions” tab and movement of cameras at the “Animation” tab.
In the case of product videos/ tutorials, you can even apply Picture-in-Picture, dragging a second video on the track just above the main video and resizing it in the Preview Window.
In the case where the quality of your B-roll is not the best, you should then run it through the AI Video upscaler on CapCut and then drag it to the timeline. This makes everything consistent when it comes to resolution and your final video.
Step 4: Add Captions and Voiceovers Automatically
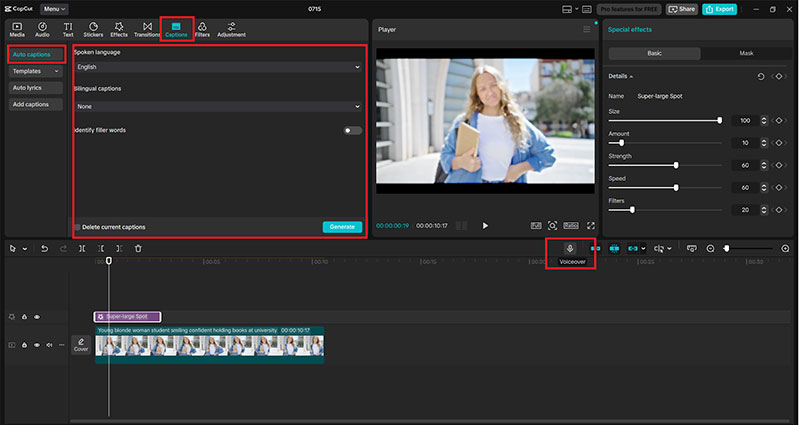
Captions are used to increase accessibility and involvement on YouTube. Go to CapCut, and in the tab titled “Captions”, select “Auto captions“. Make your language and audio choice and press “Generate”. With CapCut, there are some synced subtitles created automatically.
Feeling like you want to add a voiceover, yet you do not like to record one? Avail of the “Text to speech” option in CapCut. Access the “Text” tab > “Text to speech” and insert your script, select a voice style, and tap “Generate speech”.
You can also change the speed and tone of the voice to best suit your brand or tone of tape.
Step 5: Export Video in the Right Format
When you feel your video has been done to perfection, click on “Export” in the top-right corner. Under export panel:
Choose MP4 format
Set your resolution to 1920×1080 (Full HD) or 3840×2160 (4K)
The frame rate should be 30 fps or 60 fps, depending on your original footage
Just give your video a keyword-rich title (it is automatically edited as YouTube SEO) and export it again until you have the final version saved on your system.
You may now upload directly to YouTube and communicate to your audience at an even faster rate!

Extra Productivity Hacks by CapCut Desktop Video Editor
Keyboard Shortcuts: There are some simple keys that you can learn to use, such as Ctrl + B (Split), Ctrl + Z (Undo), and Ctrl + E (Export) to speed up the work.
Template: CapCut has reusable intro/outro templates (win), all you need to do is import them, replace what you want, and you are ready to go.
Bulk Voiceovers: You can use the AI voice generator to dynamically generate multiple script-based narrations and drop them at the required locations.
Final Thoughts
And in case you are a YouTuber determined to develop with steady and sleepy tools, CapCut Desktop is your quicker way to premium content. Through options such as drag-and-drop editing, auto-captioning, the AI voice generator, and text to speech AI, CapCut provides you with all the tools to edit smartly, but not hard.
Even better? The prompts of the high-quality outcome of a low-quality image are by some of the tools available, such as the AI video upscaler, in making it look sharp and professional. Are you making daily vlogs, tutorials, or a product review? CapCut Desktop offers you the speed, quality, and ease of use that creators desire in the modern age.
Try it out today, and you will not wish to edit slowly again.

Renowned for his expertise in logo design and visual branding, Bogdan has developed a multitude of logos for various clients.
His skills extend to creating posters, vector illustrations, business cards, and brochures. Additionally, Bogdan's UI kits were featured on marketplaces like Visual Hierarchy and UI8.
He also wrote in the past years on sites like Design Your Way, WebDesignerDepot, WPDean, Designmodo, Speckyboy, Slider Revolution, and more.
- Best Visual Regression Testing Tools for Web and App Design in 2026 - 13 October 2026
- Jujutsu Kaisen Font Generator - 12 October 2026
- The Windsurf Logo History, Colors, Font, And Meaning - 10 October 2026

Bogdan Sandu is a seasoned designer who has been designing websites since 2008. Renowned for his expertise in logo design and visual branding, Bogdan has developed a multitude of logos for various clients. His skills extend to creating posters, vector illustrations, business cards, and brochures. Additionally, Bogdan's UI kits were featured on marketplaces like Visual Hierarchy and UI8. He also wrote in the past years on sites like Design Your Way, WebDesignerDepot, WPDean, Designmodo, Speckyboy, Slider Revolution, and more.
You Might Also Like