

The ear is the facial feature most artists quietly skip or rush through. That choice shows every time.
Learning how to draw an ear comes down to understanding the 6 anatomical parts of the pinna and how they relate to each other in three-dimensional space. Helix, antihelix, concha, tragus, antitragus, earlobe. Get those right and the rest follows.
This guide covers everything from basic ear anatomy and face proportions to shading the concha, drawing from different angles, and handling age variations. Whether you work in pencil or digitally in Procreate or Clip Studio Paint, the same structural principles apply.
By the end, ear drawing will feel like a process, not a guessing game.
What Is the Basic Structure of a Human Ear?
The human ear has 6 key anatomical parts that every artist needs to memorize before putting pencil to paper: helix, antihelix, tragus, antitragus, concha, and earlobe.
Each of these parts has a specific location, shape, and role in the ear’s overall form. Getting these wrong is what makes most ear drawings look flat or off.
The outer ear (also called the pinna) is the only part you actually draw in portrait work. Everything behind the eardrum, including the middle and inner ear structures, stays invisible. So your job as an artist is entirely focused on the pinna and its surface anatomy.
The Helix and Antihelix
Helix: The outer rim that curves from the top of the ear down toward the lobe. It forms the visible “border” of the whole ear shape.
Antihelix: The Y-shaped ridge sitting inside the helix. This is where most beginners go wrong. The fork splits upward into 2 separate crura, creating the distinctive inner ridgeline of the ear.
Both structures are raised cartilage. They sit above the surface level, which means they catch light and cast their own shadows.
The Tragus, Antitragus, and Concha
| Structure | Location | Visual Feature |
|---|---|---|
| Tragus | Front of ear canal opening | Small raised flap, points inward |
| Antitragus | Opposite the tragus | Rounded bump above the lobe |
| Concha | Central bowl between ridges | Deepest point of the outer ear |
The concha is the hollow center of the ear. It’s the darkest area in any shaded ear drawing because it sits the lowest in terms of depth.
The Earlobe
The earlobe is pure fatty tissue with no cartilage. That makes it the softest, most rounded form on the entire ear.
It connects to the jaw area below the antitragus. The connection angle matters a lot in portrait work, especially on different face types.
What Are the Proportions of the Ear Relative to the Head?
The ear sits between the brow line and the base of the nose in standard portrait proportions. That vertical zone covers roughly one-third of the total face height, which tells you exactly how tall the ear should be on your drawing.
Ear width runs about half its total height. So if the ear is 3 units tall, it should be approximately 1.5 units wide.
Ear Placement on the Face
The top of the ear aligns with the brow line. The bottom of the ear aligns with the base of the nose. Both reference points sit within the middle third of the face (Virtual Instructor, facial proportions guide).
The ear also tilts slightly. Numberanalytics notes the typical tilt angle sits between 15 and 20 degrees from vertical, leaning with the top slightly toward the back of the head. Beginners consistently draw ears too vertical, which looks stiff.
How Head Angle Changes What You See
Front view: The ear foreshortens significantly. Only the helix rim and lobe are clearly readable. Most of the interior structure collapses into a thin vertical strip.
3/4 view: The most common angle in portraiture. Helix, antihelix, tragus, and concha all become visible at once. This is the angle worth practicing most.
Profile view: Full ear silhouette with clean readable shapes. Interior detail is visible but reads as a single coherent form rather than overlapping ridges.
The ear’s length in profile is approximately one-third of total head length (Numberanalytics, 2025). If the head measures 9 inches top to chin, the ear should sit at roughly 3 inches tall.
Placement Mistakes to Fix
- Drawing the ear too high (above the brow line)
- Drawing the ear too vertical (ignoring the 15-20 degree tilt)
- Making the ear too wide relative to its height
- Placing the ear too far forward on the jaw (it belongs above the jawline, past the cheekbone area)
What Tools and Materials Work Best for Drawing an Ear?
The right tools change what you can actually achieve. A 2B pencil and an HB pencil serve very different purposes, and knowing which to reach for at each stage cuts your correction time significantly.
Pencils for Traditional Drawing
HB pencil: Construction lines, initial blocking, proportion checks. Light enough to erase cleanly without ghost marks.
2B pencil: General ear sketch once proportions are locked in. Good mid-range tone for the helix and antihelix ridges.
4B pencil: Deep shadow work inside the concha. The 4B lays down enough dark value to convey the depth of the ear canal area without requiring heavy pressure that tears paper.
Blending stumps work well for the concha’s gradient transitions. Kneaded erasers are better than vinyl erasers here since they lift graphite without damaging the surface.
Digital Tools
A 2024 survey of 12,000 digital artists found that 43% listed Procreate as their primary tool (artpembrokeshire.co.uk, 2024). For ear drawing specifically, Procreate’s pressure-sensitive brushes handle the soft gradients in the concha and the crisp edge work on the helix rim in the same session.
Clip Studio Paint is the second most-used app, with 31% of freelance comic artists using it as their main tool (artpembrokeshire.co.uk, 2025). Its stabilization settings are especially useful for clean antihelix lines.
Adobe Fresco handles ear shading differently from both, with its live brushes blending in real time rather than requiring manual smudging.
Reference Tools
| Tool | Purpose | Best For |
|---|---|---|
| Line of Action | Timed ear gesture practice | Building speed and proportion memory |
| Quickposes | Photo reference sessions | Studying real ear variation |
| SculptGL | 3D browser model rotation | Understanding ear depth from any angle |
SculptGL is underused by most beginners. Being able to rotate a 3D ear model to any angle in the browser beats searching for the exact photo reference you need.
How to Sketch the Basic Ear Shape
Start with a simple “C” shape or elongated oval for the outer silhouette. This gives you the general ear height and width before any detail goes in.
The outer contour of the ear is essentially 1 continuous stroke: the helix curves from the top, bends forward at the middle, and ends at the lobe. Gvaat’s anatomy guide describes the helix curve as hook-shaped at the top (the “A” shape) with the lobe completing the bottom as a smaller curve (the “B” shape).
Construction lines come next. A light horizontal line at the ear’s midpoint and a vertical center line help anchor interior structures before you commit to them.
How to Draw the Helix and Antihelix
Helix first. Start from the top of the “C” and trace the rim inward, looping it down to merge with the upper edge of the lobe. The helix thickens slightly at the top, where it folds over itself.
The most common beginner mistake is making the helix too thin and uniform all the way around. It’s thicker at the top fold, thinner as it approaches the lobe.
Antihelix second. Draw a Y-shape inside the helix. The stem of the Y starts near the antitragus area and forks upward toward the top of the helix. Each branch of the fork creates a raised ridge on either side of a central groove.
Art Rocket’s drawing guide (Clip Studio Paint, 2026) confirms that the Y-shape interior structure is the single most reliable way to establish the antihelix correctly before adding surface detail.
How to Draw the Tragus and Antitragus
The tragus is a small flap in front of the ear canal. Draw it as a rounded triangular bump, pointing slightly inward toward the center of the ear.
The antitragus sits directly above the lobe on the opposite side, facing the tragus. It’s smaller than the tragus and more rounded, often overlooked entirely in beginner drawings.
Size check: The tragus should be noticeably smaller than the concha bowl and sit at roughly the same vertical position as the midpoint of the ear. If you draw the tragus too large, the whole lower section of the ear looks blocked and unnatural.
How to Draw the Earlobe
The earlobe connects to the lower end of the helix and the antitragus. Unlike every other part of the ear, it has no cartilage underneath, so it hangs with a soft, weighted appearance that cartilage-heavy areas like the helix rim don’t have.
There are 3 main earlobe types. Drawing the wrong type for your reference will make the ear look like it belongs to a different person.
Attached vs. Detached Earlobes
Detached earlobe: Hangs freely below the head, creating a visible gap between the lobe and the jaw. This is the most commonly drawn type and the one that reads clearly in profile.
Attached earlobe: The lobe merges directly into the jaw without hanging down. Draw it as a smooth continuation of the lower helix curve rather than a separate hanging form.
Intermediate type: Partially attached with a subtle downward curve before meeting the jaw. More common than beginners realize.
The connection angle matters most in 3/4 view portraits. Looking at where the lobe meets the jaw and how that junction curves gives the ear its grounded quality in the composition.
Stylized vs. Realistic Earlobe Rendering
In realistic portrait work, the lobe has subtle volume. It reads as a small rounded pillow of soft tissue with a slight shadow under it where it meets the jaw.
In anime and cartoon styles, the lobe simplifies to a single downward curve or a small “C” hook at the base of the ear. Artists working on how to draw Nezuko or similar anime characters will find the simplified lobe is just the bottom close of the main ear oval with a minimal notch at the base.
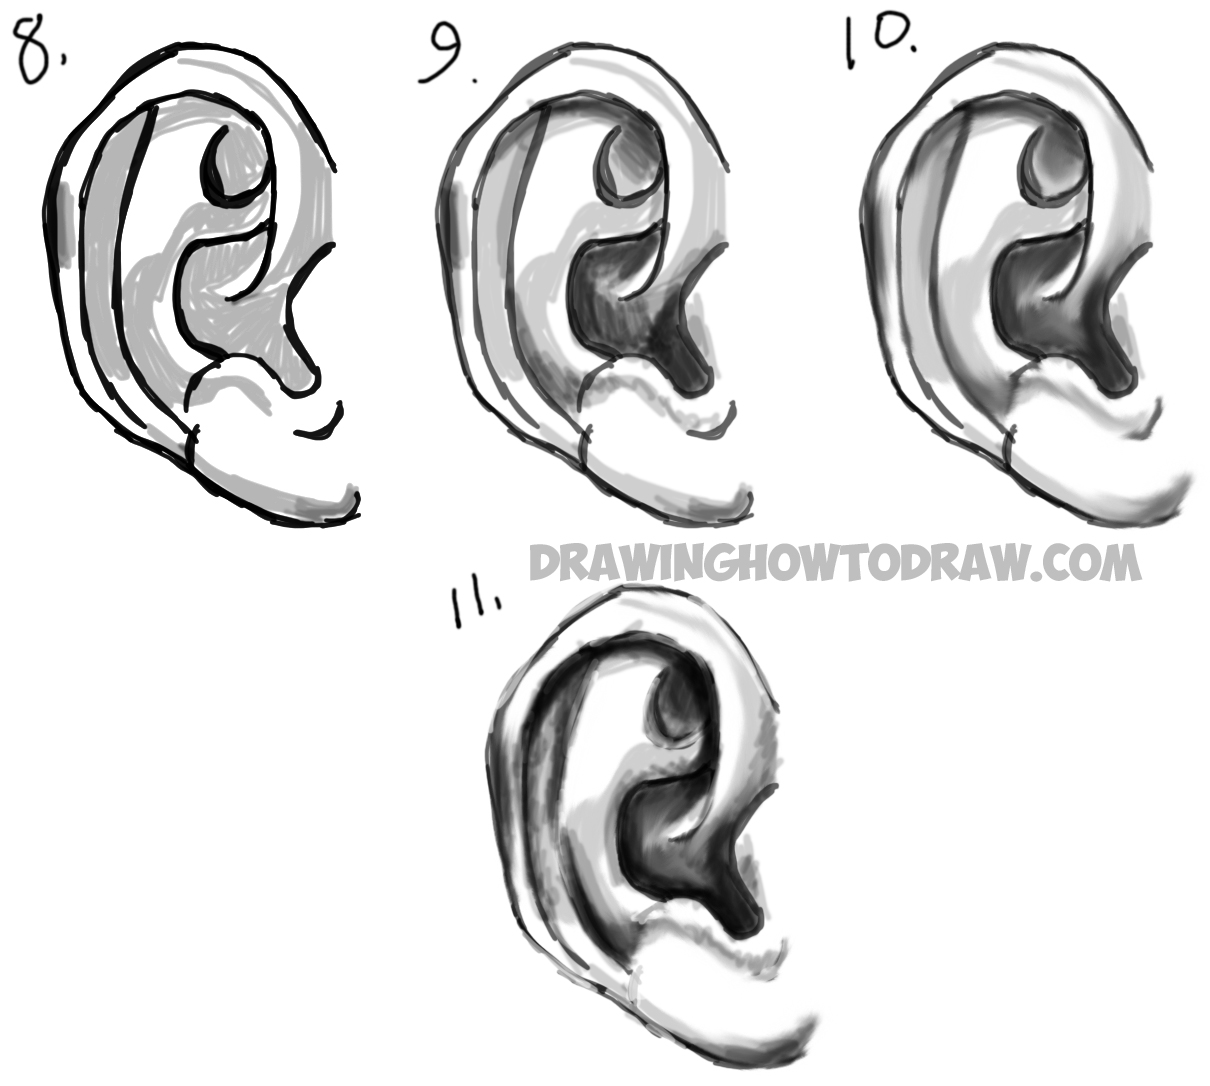
How to Add Interior Depth and Shadow to the Ear
The ear works in layers of depth. The concha sits deepest. The antihelix ridges sit above it. The helix rim sits highest. Shadow intensity should match this depth order exactly.
A 2024 survey of online art learners found that shading is the step most students spend the least time on, despite it being responsible for most of the realism in a finished drawing (Business Research Insights, 2024).
How to Shade the Concha
The concha is the primary shadow zone. It receives the darkest values in any ear drawing regardless of light source direction.
Start with the deepest point near the ear canal opening. Build the shadow outward from there, letting it fade as it climbs toward the antihelix ridges. The gradient should transition clearly from near-black at the canal to mid-tone at the bowl’s outer edge.
Common mistake: Filling the entire concha with uniform dark tone. The depth reads much better with a visible gradient. Flat fills kill the sense of volume entirely.
How to Shade the Helix Rim and Ridges
The helix rim catches direct light along its top edge, particularly where it folds over at the top of the ear. This light edge is often left as the lightest value in the drawing, even lighter than the face around the ear.
The antihelix ridges create 2 secondary shadow lines running down through the center of the ear. Each ridge has a lit edge facing the light source and a shadow edge facing away.
Quick rule: Light source from the front means the antihelix ridges are lit on their inner edges and shaded on their outer edges. Light from the side reverses this. Knowing this before shading saves a lot of corrections later.
If you are practicing how to draw shadows as a separate skill, the ear is one of the best subjects to work from because it compresses cast shadow, core shadow, and reflected light all into a small area.
How to Draw an Ear From Different Angles
The ear looks structurally different at every angle. What you see at 90 degrees profile is not what you see at 45 degrees, and both differ from what is visible in a front-facing view. Treating all angles the same is one of the fastest routes to stiff, unconvincing ear drawing.
The global art classes market was valued at $6.8 billion in 2024 and is forecast to double by 2033, growing at 8.1% annually (MarketIntelo, 2024). Much of that growth comes from learners seeking tutorials on exactly these kinds of multi-angle technical challenges.
Front View
In direct front view, the ear foreshortens into a thin vertical strip.
The helix rim is the dominant visible element, running as a curved edge along the far side of the ear. The interior structure (antihelix, concha) compresses and becomes much harder to read. Most of the ear’s depth disappears. Draw it as a simple elongated shape with minimal interior detail rather than trying to force the full anatomy into a compressed form.
3/4 View
This is the angle that shows the most information at once.
All 6 major structures become readable: helix, antihelix, tragus, antitragus, concha, and lobe. The concha opens up enough to show genuine depth. The antihelix Y-fork reads clearly. This is the angle most portrait drawings use and the one to get most comfortable with first. Practice it before spending time on the others.
Profile View
Profile is the cleanest silhouette. The helix makes a single, clear outer curve from top to lobe.
Interior detail reads as a series of nested shapes rather than overlapping ridges. The tragus becomes the most visible single element, sitting as a distinct projection in front of the ear canal. The ear’s tilt (15-20 degrees from vertical) is most obvious at this angle. Get the tilt wrong in profile and the whole head placement looks incorrect.
Understanding how to draw heads in general gives the ear angle choices the context they need. The ear’s position in profile is one of the clearest indicators of whether a head drawing has correct three-dimensional structure.
Back View
Back view shows only the helix rim and the lobe. Everything else is hidden.
Draw it as a simple “C” or reversed bracket shape with a lobe hanging off the bottom. The lobe shape becomes especially important here since it’s one of only 2 visible elements. Keep the back view simple. There is genuinely very little to add.
How to Draw Ears on Different Face Types and Ages
Ear shape is not universal. Children, elderly people, and stylized characters each require a different approach to ear construction and proportion. Getting this right is what separates a generic ear from one that actually belongs to the face it sits on.
Andrew Loomis covers these age-specific differences directly in “Drawing the Head and Hands” (first published 1956, still in print), breaking down ear construction across gender and age as part of his head-drawing system.
Children’s Ears
Key difference: Children’s ears grow before other facial features, so they appear proportionally large for the head during early years (Envato Tuts+, anatomy fundamentals guide).
The lobe is barely developed in young children. It sits almost flush with the lower jaw rather than hanging freely. Interior detail (antihelix, tragus) is present but softer, with less defined ridges.
Draw children’s ears with:
- Wider, rounder outer silhouette
- Minimal lobe hang
- Softer antihelix fork with less sharp edge contrast
- Ear sitting slightly higher on the face relative to adult proportions
Elderly Ears
Earlobes elongate noticeably with age. The lobe droops further from the jaw than in younger faces, especially in people who have worn earrings long-term (Envato Tuts+, anatomy fundamentals guide).
Cartilage ridges sharpen. As surrounding soft tissue thins with age, the helix and antihelix become more pronounced visually. More shadow contrast appears at the ridge edges.
Draw elderly ears with:
- Extended, hanging lobe
- More visible helix rim definition
- Deeper shadow in the concha from thinning tissue
- Slight forward lean from overall head posture changes
Stylized and Anime Ears
Anime ears simplify to a “C” outer shape with a single internal hook line.
No antihelix fork. No distinct tragus. The concha reduces to a single curved shadow mark. The lobe reads as a small closed loop at the bottom. Working on how to draw portraits in a stylized context means making these simplification decisions deliberately rather than accidentally.
| Style | Helix | Interior detail | Lobe |
|---|---|---|---|
| Realistic | Full rim with thickness | Antihelix fork, tragus, concha | Hanging or attached, detailed |
| Semi-realistic | Simplified rim | Basic Y-shape, minimal tragus | Rounded, clear separation |
| Anime/Cartoon | Single C-curve | Single hook or none | Small loop, no shading |
How to Draw an Ear with Hair Covering Part of It
Hair covering the ear is one of the trickier compositional problems in portrait drawing. Most beginners either draw the full ear and paste hair over it, or skip the ear entirely. Both look wrong.
The fix is understanding what stays visible and drawing only that, while suggesting the rest through value and edge work.
What Remains Visible
When hair covers the ear, the helix tip and the earlobe are the 2 elements most likely to stay visible.
The helix tip pokes through hair along the upper edge of the ear. The lobe hangs below the hair mass. In side-parted styles, the tragus and front edge of the ear also show.
Draw just these visible elements in full detail. The rest does not need to exist on the page.
Suggesting the Ear Under Hair
Do not draw the full ear first and then cover it with hair. That layering approach almost always creates a visual seam where the hair appears to sit on top of a surface rather than flow around a volume.
Process instead:
- Block in the hair mass first
- Mark where the helix tip and lobe will peek through
- Draw those exposed elements with full detail
- Use a mid-tone value where the hair overlaps the ear area to push it into the background
The “Pasted On” Mistake
The most common error is drawing the ear at full contrast and then adding hair lines across it.
The ear reads as if it is glued to the front of the hair rather than tucked behind it. Fix it by reducing the ear’s value contrast in the overlapping zone and letting the hair edges pass cleanly in front of the ear. The ear needs to visually recede. Lighter values and softer edges in the overlap area achieve this quickly.
Common Ear Drawing Mistakes and How to Fix Them
Most ear drawing problems come from 1 of 2 sources: skipping the anatomy study, or copying the general idea of an ear without understanding what each part actually looks like in 3D space.
Art Prof (artprof.org) notes that adding detail too early, before establishing structural fundamentals, is one of the most consistent mistakes across portrait drawing generally. Ears are especially vulnerable to this because they look complicated enough that beginners rush to add interior lines before the basic silhouette is correct.
Drawing the Ear Too Flat
No depth in the concha means no believable ear. Full stop.
A flat concha is the single most identifiable sign of a rushed ear drawing. The concha is not a surface. It is a hollow. The darkest value in the entire ear sits at its deepest point, near the ear canal opening.
Fix: Before adding any interior lines, establish the concha shadow first. Start with dark value at the canal and build outward. Everything else gets positioned relative to that depth anchor.
Wrong Placement on the Face
The ear placed above the brow line or below the nose base is immediately readable as wrong, even to non-artists (Virtual Instructor, facial proportions guide).
The brain flags facial proportion errors faster than almost any other drawing mistake. Placement errors in the ear are harder to fix later than proportion errors in features like the nose or mouth.
Check: Draw a light horizontal line from the brow and another from the nose base. The ear should sit entirely between those 2 lines. If it doesn’t, move it before adding any detail.
Treating the Helix and Antihelix as Parallel Lines
They are not parallel. They are not even close to parallel.
The helix runs the outer rim. The antihelix runs an interior path that forks at the top. Drawing them as 2 similar curved lines running alongside each other removes all depth from the center of the ear and makes both structures look like the same thing.
Fix: The antihelix fork is the key distinction. The Y-split at the top is what separates the antihelix from the helix visually. Draw the fork first, then add the helix as a separate outer rim that never mirrors the antihelix path.
Overdetailing the Tragus, Underdetailing the Concha
Beginners often spend the most time on the tragus because it is a distinct recognizable shape sitting at the front of the ear. Easy to see, easy to draw.
The concha gets less time because it is harder to understand in 3D. The result: a detailed tragus flap in front of a flat, shadeless bowl. The proportional attention is exactly backwards from where depth and realism actually live.
How to Practice Drawing Ears Efficiently
Consistent focused practice beats long occasional sessions. An illustrator at Kamila Stankiewicz’s studio noted visible progress after just 30 minutes of daily gesture sessions maintained for one month (kamilastankiewicz.com, 2025).
Ears specifically reward focused short sessions over general drawing time, because the anatomy is compact enough to study in isolation. 10 ears per session targeting one angle or one feature is more useful than drawing 2 full portraits that each include an ear.
Gesture Drawing with Timed Sessions
Tools: Line of Action (lineofaction.com) and Quickposes both support timed ear-specific practice sessions.
Set sessions to 2-5 minutes per pose. The goal is not a finished drawing. The goal is getting the basic silhouette, the antihelix Y-fork, and the concha placement correct within the time limit.
Gesture drawing sessions ranging from 30 seconds to 5 minutes per pose build instinctive proportion memory faster than untimed work, according to MasterClass’s gesture drawing guide (2021). That instinct transfers directly to ears when you isolate the subject.
Drawing from 3D References
SculptGL is free, browser-based, and lets you rotate a 3D head model to any angle.
This matters because photo references are fixed to one angle. SculptGL lets you find the exact 3/4 or profile angle you are struggling with, rotate it slightly, and study the ear’s depth relationships from multiple positions in a single session.
Artists working on complex character references like how to draw dragon characters or similar multi-angle subjects use this 3D rotation approach regularly, and it applies equally to human ear anatomy study.
Master Studies from Loomis and Bridgman
Andrew Loomis covers ear construction as part of his head-drawing system in “Drawing the Head and Hands.” Copying his ear diagrams directly is a faster way to internalize the structure than working only from photos.
George Bridgman’s constructive anatomy approach breaks the ear into simplified planes and forms. Bridgman studied under academic painters and his ear drawings reduce the complex cartilage structure to a small number of readable shape groups.
Copy both. Study where they simplify differently and why. That comparison alone teaches more about ear construction than most tutorials.
Focused Daily Practice Structure
Consistency matters more than session length (Kamila Stankiewicz, 2025).
A workable daily structure:
- 5 ears from 3/4 view (most common portrait angle)
- 3 ears from profile (clean silhouette practice)
- 2 ears from the front (foreshortening practice)
That is 10 drawings per session. At 2-3 minutes each, the whole session runs under 30 minutes. After 2-3 weeks of this, ear construction starts to feel automatic rather than effortful.
If you want broader portrait practice alongside this, combining ear studies with how to draw lips and how to draw a nose as focused feature sessions keeps each session short while covering the full face over time.
FAQ on How To Draw An Ear
What are the basic parts of the ear I need to know before drawing?
Focus on 6 structures: helix, antihelix, tragus, antitragus, concha, and earlobe. These are all visible on the outer ear (pinna). Everything else, including the inner ear canal, stays hidden. Learn these 6 and your ear drawings immediately become more accurate.
Where does the ear sit on the face?
The top of the ear aligns with the brow line. The bottom aligns with the base of the nose. That zone covers the middle third of the face. The ear also tilts slightly, around 15 to 20 degrees from vertical, leaning toward the back of the head.
What is the easiest way to start sketching an ear?
Start with a “C” shape for the outer silhouette. Then draw a Y-shape inside for the antihelix. Add the tragus as a small bump near the ear canal. Build from these 3 elements before adding any detail or shading.
Why does my ear drawing always look flat?
The concha is almost always the problem. It is the deepest part of the ear and needs the darkest shadow values. Most beginners either skip it or shade it too lightly. Start every ear shading session by establishing the concha depth first.
How do I draw an ear from the side (profile view)?
Profile is the cleanest angle. The outer helix makes one continuous curve from top to lobe. The tragus becomes the most distinct visible element. Get the 15-20 degree tilt correct and the ear silhouette will read naturally within the head’s structure.
How do I draw an ear in a 3/4 view portrait?
The 3/4 view shows the most ear anatomy at once. The helix, antihelix fork, tragus, concha, and lobe all become visible. Practice this angle first. It appears in most portraits and builds the strongest understanding of ear depth and form.
How does ear shape change with age?
Children have larger ears relative to their heads, with minimal lobe development. Elderly ears have elongated, drooping lobes and sharper cartilage ridges as surrounding tissue thins. Adjust lobe length and ridge definition based on the character’s age before adding detail.
How do I draw a simplified ear for anime or cartoon characters?
Reduce the ear to a C-shape outer curve with a single internal hook line. No antihelix fork. No distinct tragus. The lobe becomes a small closed loop at the bottom. Refer to how to draw Nezuko for a clear example of this simplification in practice.
What pencils should I use for realistic ear drawing?
Use an HB for construction lines and initial blocking. Switch to a 2B pencil for the general ear sketch once proportions are set. Use a 4B for deep shadow work inside the concha. A blending stump handles the gradient transitions between shadow zones cleanly.
How do I practice drawing ears faster?
Use Line of Action or Quickposes for timed ear reference sessions set to 2-5 minutes per pose. Draw 10 ears per session, targeting one angle at a time. Daily 30-minute sessions for one month produce measurable improvement in both speed and structural accuracy.
Conclusion
Knowing how to draw an ear is really about knowing the structure first and the rendering second.
Once you have the ear anatomy locked in, everything else, from concha shading to profile silhouettes to age-specific lobe variations, becomes a series of deliberate decisions rather than guesswork.
Work on one angle at a time. Nail the 3/4 view before moving to foreshortened front-facing positions.
Use timed gesture drawing sessions on Quickposes or Line of Action to build proportion memory fast. Copy ear studies from Bridgman and Loomis to understand how masters simplified cartilage structure into readable forms.
Consistent short sessions beat occasional long ones. Ten ears a day, focused on one feature, compounds quickly.

- How to Draw an Ear: Tips Every Artist Needs to Know - May 28, 2026
- Fantasy Landscape Ideas to Spark Your Imagination - September 29, 2025
- Awesome examples of World of Warcraft concept art - February 10, 2025